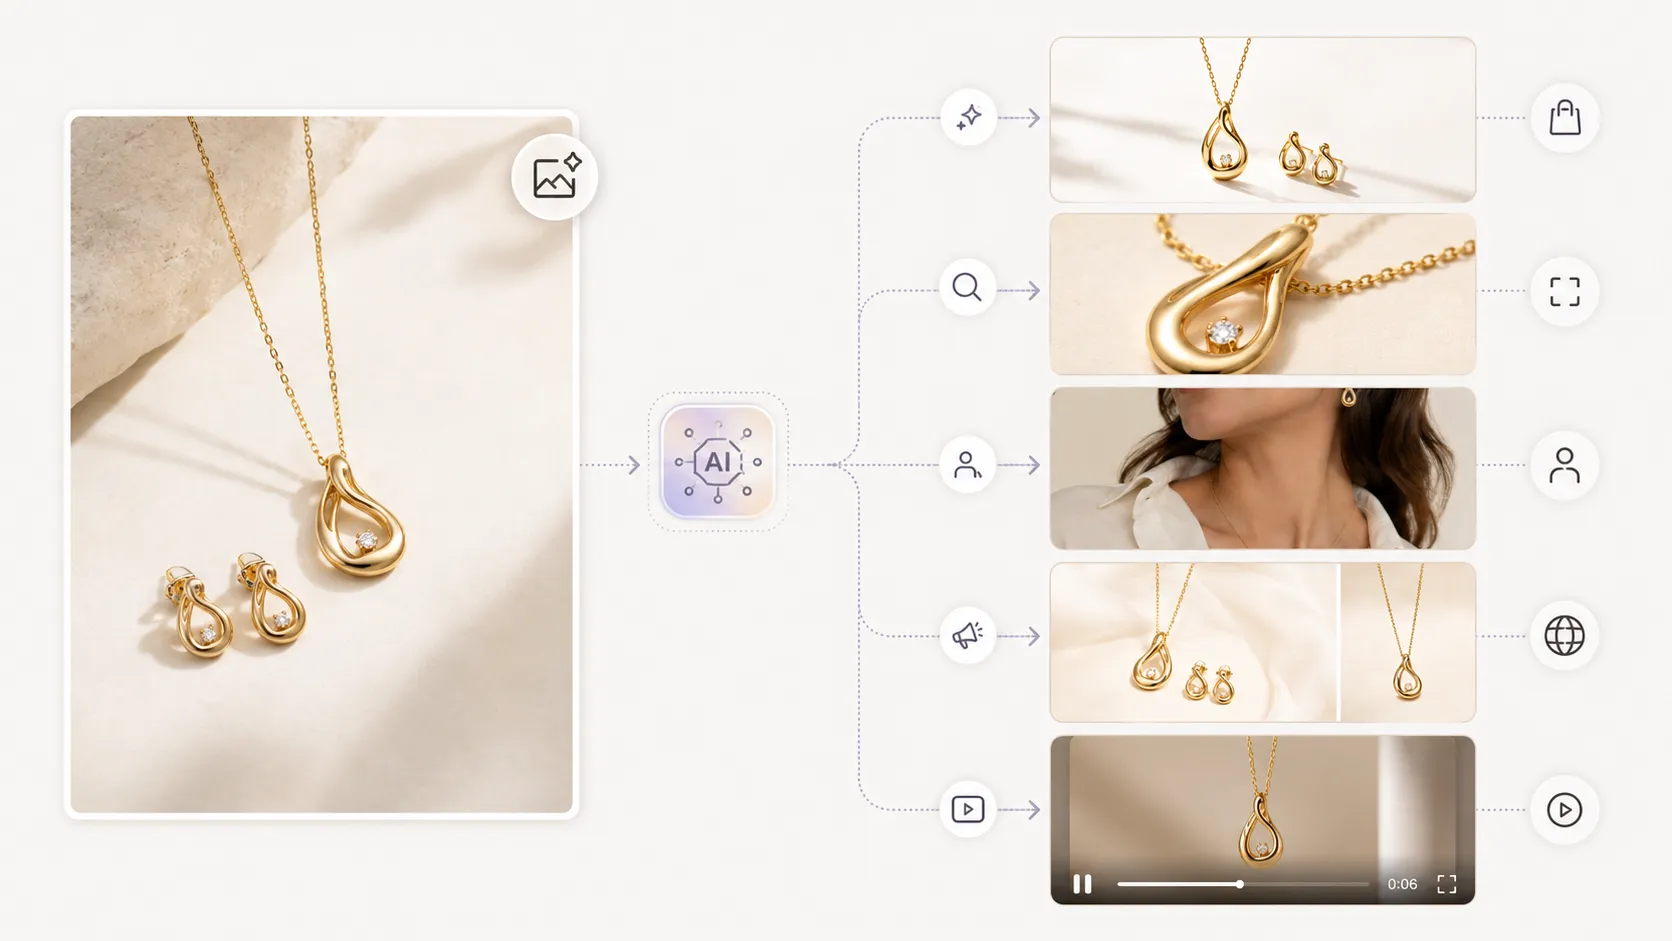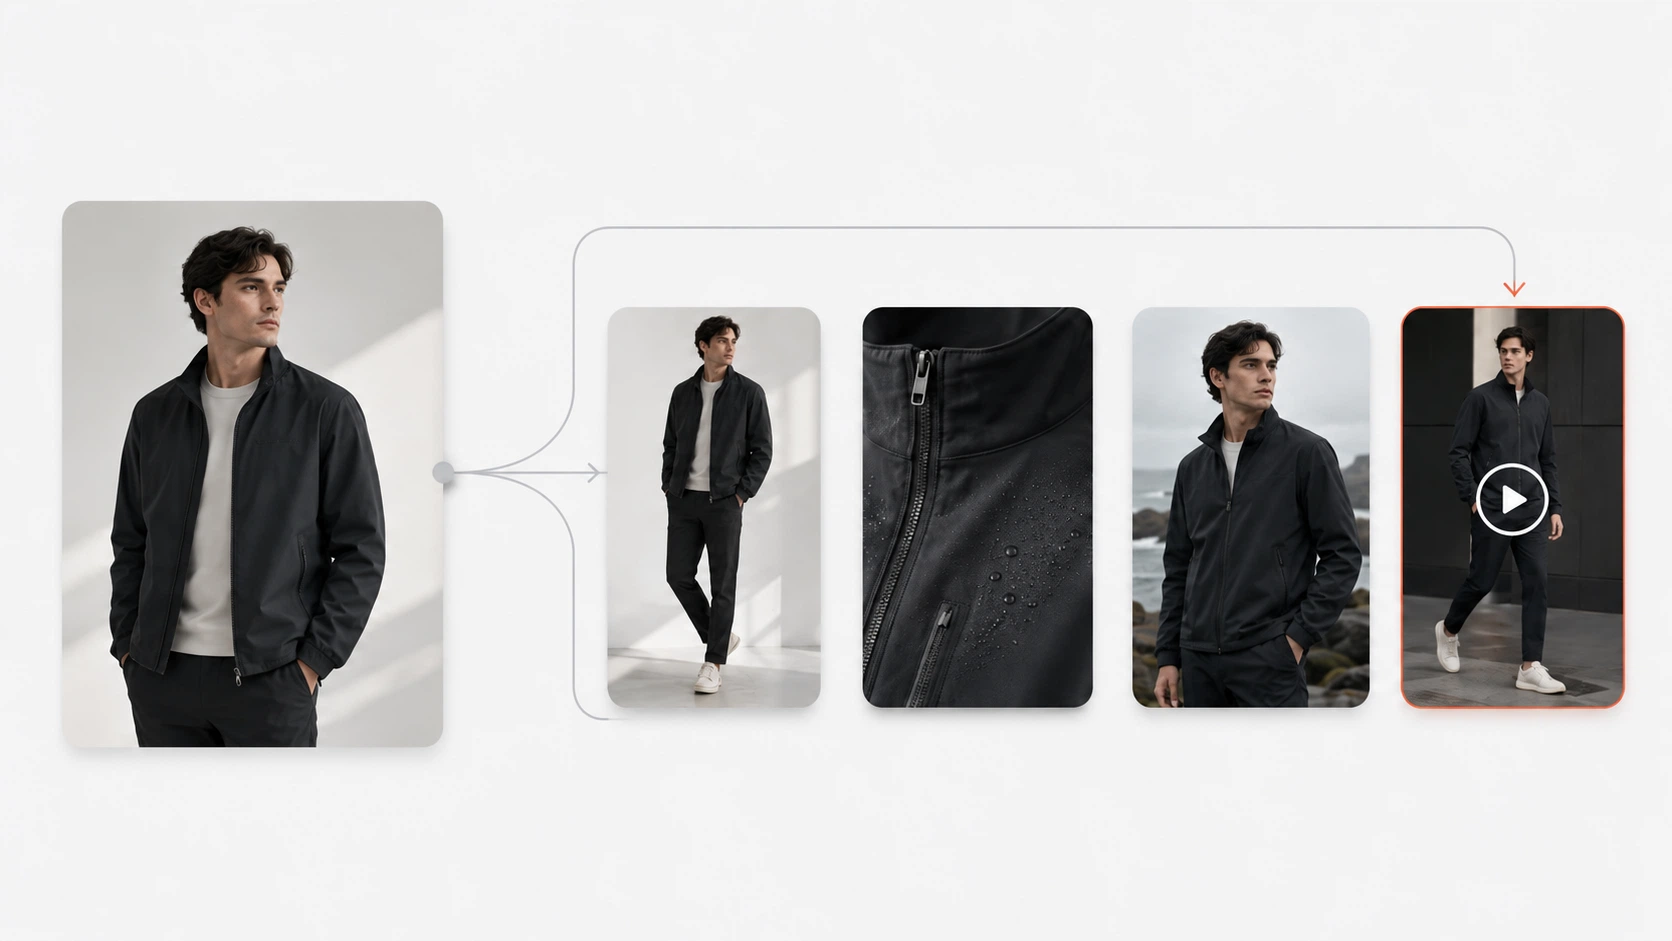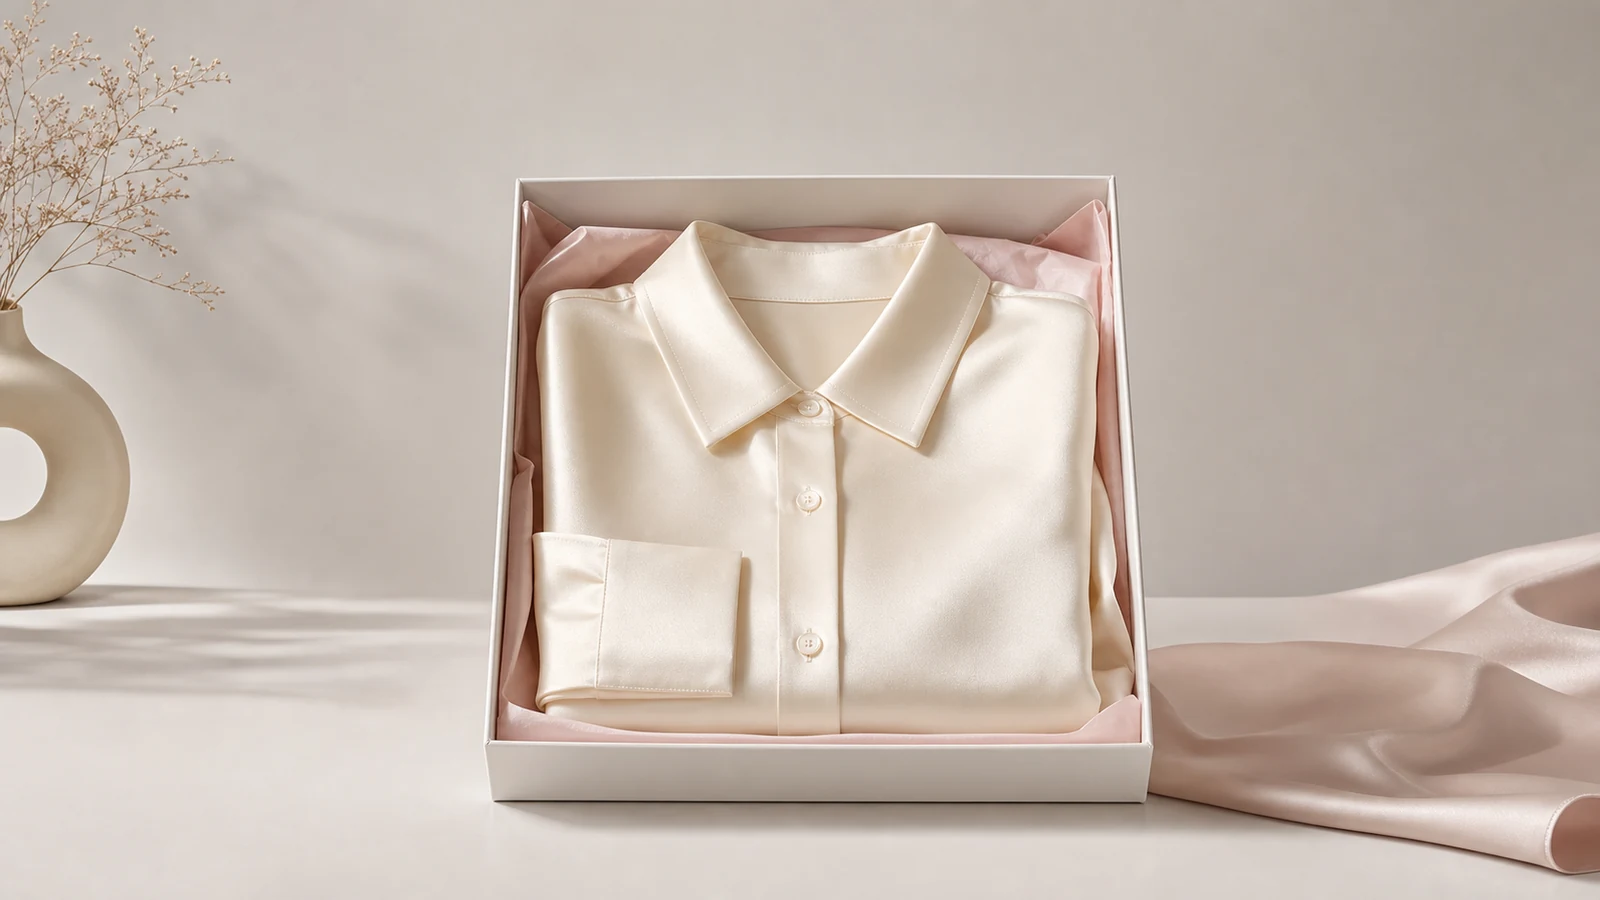




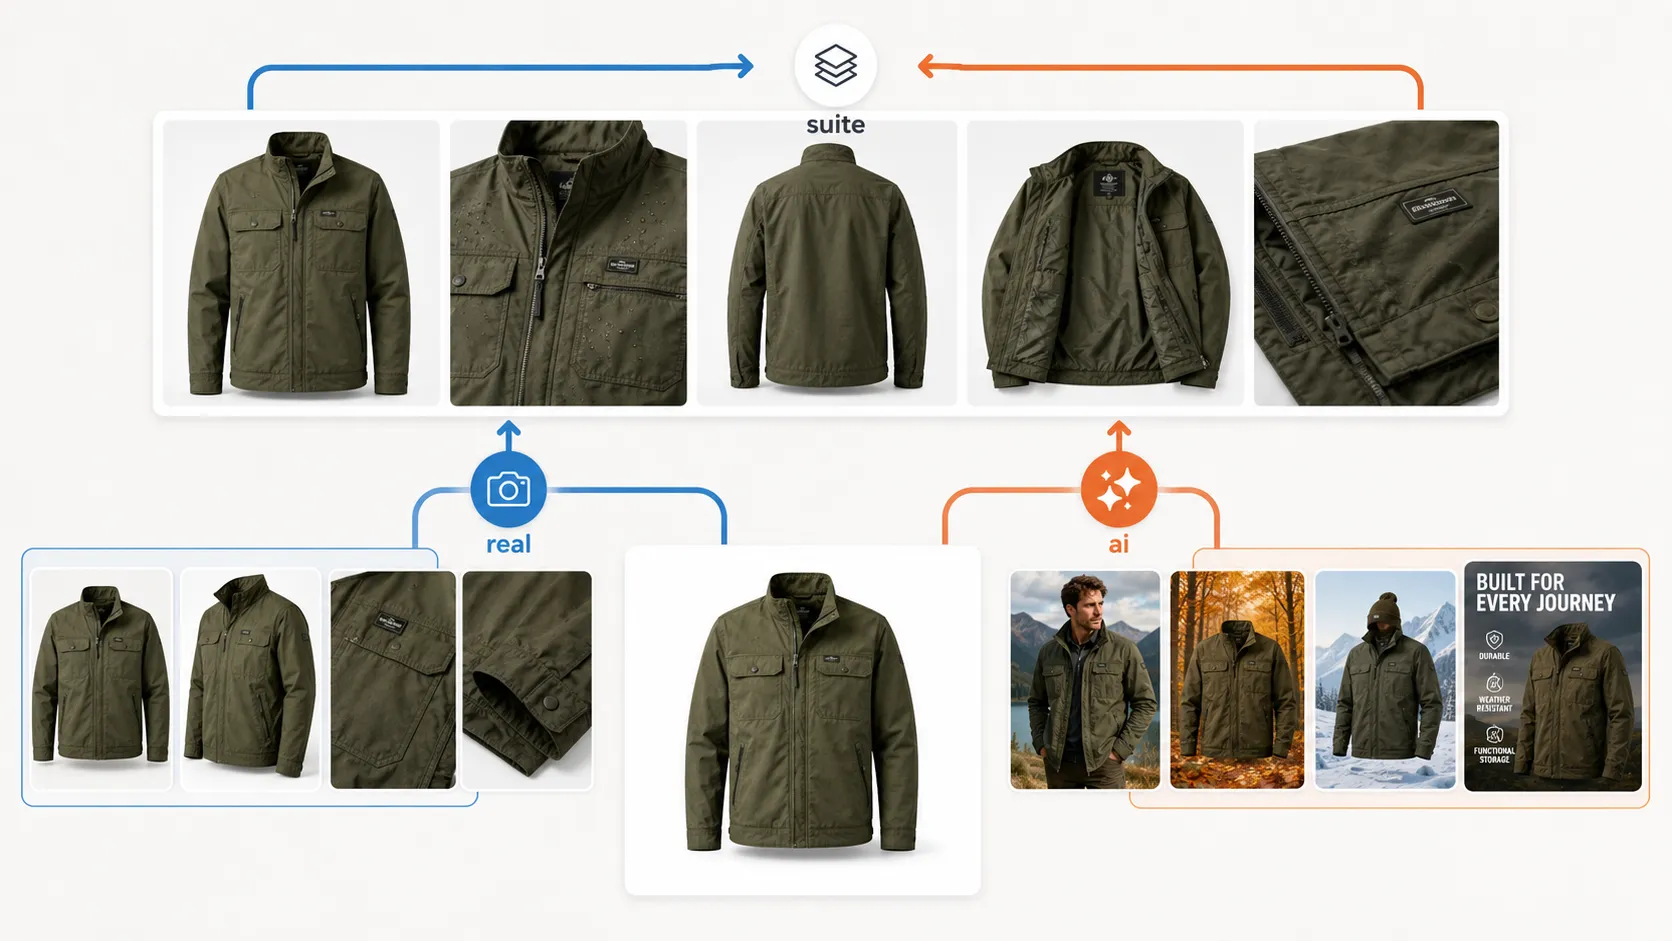
A hybrid workflow for AI product photography combines real base photography with AI-generated background variations, lifestyle scenes, and campaign visuals, allocating real shoots to hero assets while using AI for 70–80% of your catalog variations. This approach is not an experiment anymore. Across ecommerce communities on Reddit, Hacker News, and seller forums, the hybrid model has emerged as the working standard for teams that tried pure AI generation, got burned by deformed products and destroyed logos, and figured out what actually produces commercially usable output.
This guide covers the complete framework: why pure AI fails for products, the five-step hybrid workflow, a QA checklist that catches failures before they go live, an allocation matrix for deciding what to shoot versus generate, and the tool-category distinction that causes most first-time failures.
Key Takeaways
- A hybrid workflow allocates real photography to hero and top-SKU images, and AI generation to 70–80% of catalog variations, lifestyle scenes, and ad creatives.
- The number one mistake sellers make is using general-purpose AI generators instead of ecommerce-specialized tools that lock the product layer and preserve details.
- A structured five-step workflow (base capture, cutout, AI variation, QA checkpoint, channel allocation) produces consistent results when followed systematically.
- QA is not optional: a color, texture, logo, shape, and lighting checklist catches the majority of AI failures before they reach customers.
- Lifestyle scene variations tend to outperform clean background swaps for social content and ad creative because context drives emotional connection.
- Consumer ability to detect "AI-looking" product imagery is rising, and quality-focused hybrid workflows protect brand trust better than cutting corners.
Why Pure AI Generation Fails for Product Photography (And What Does Work Instead)
If you have ever uploaded a product photo to Midjourney or DALL-E and gotten back a garment with three sleeves, a melted logo, or fabric texture that does not exist in your actual inventory, you are not alone. This is the most common failure pattern reported across ecommerce communities, and it stems from a fundamental mismatch between how general AI image generators work and what product photography requires.
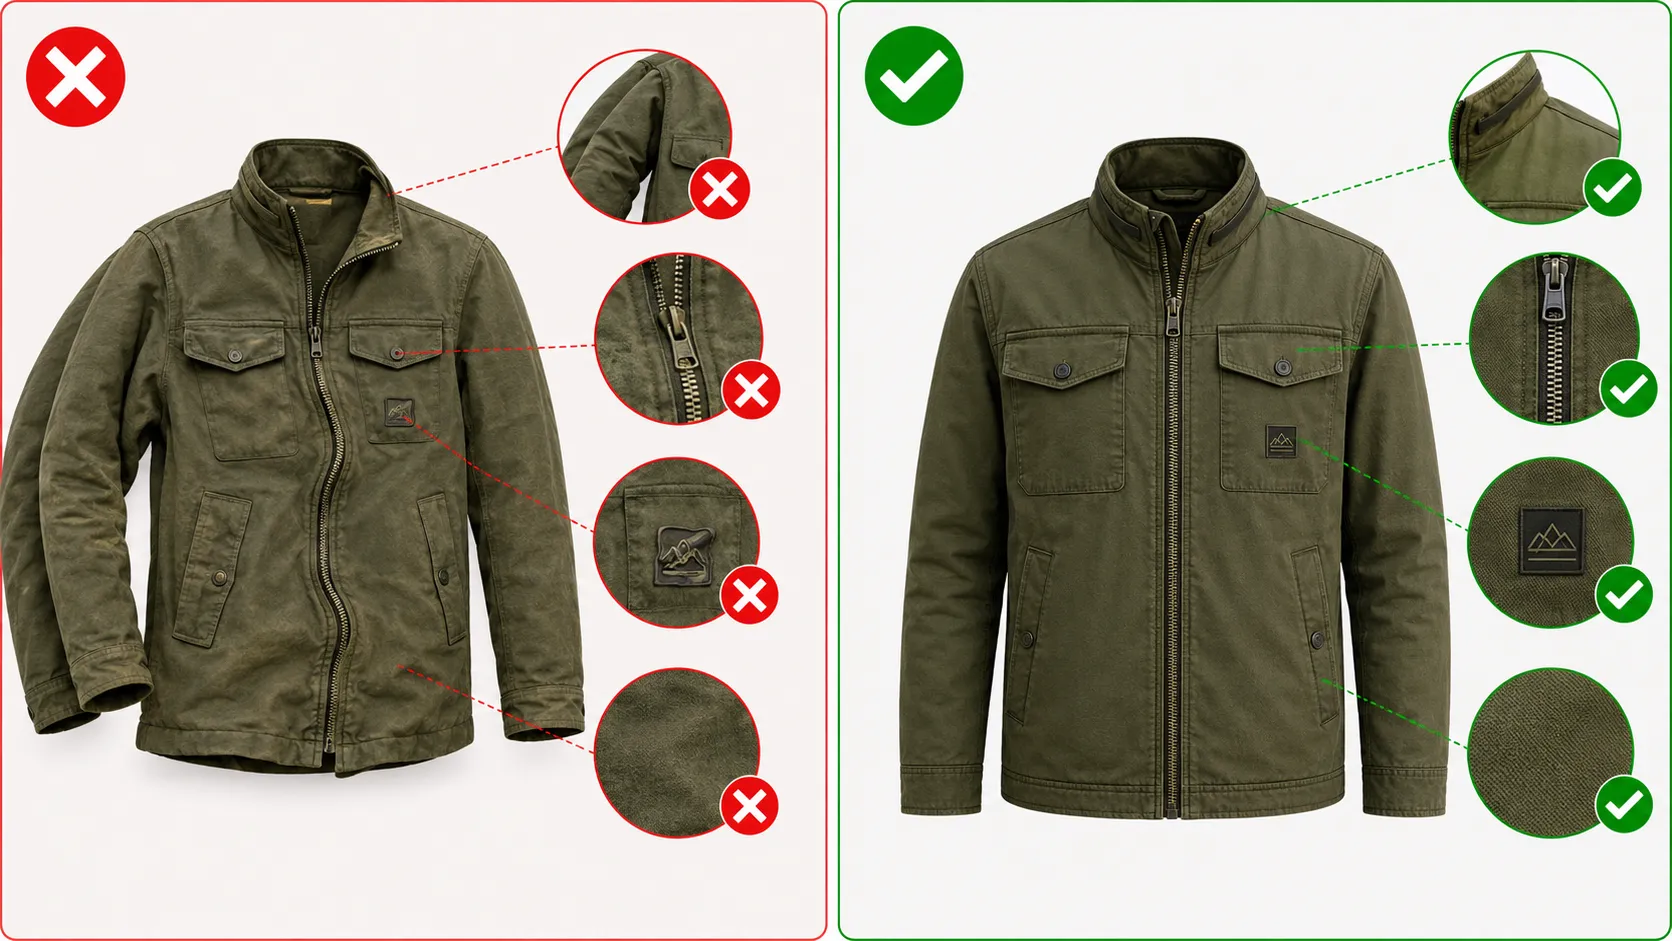
General-purpose generators operate in create mode. They take your text prompt (and sometimes an image) and generate entirely new pixels from scratch. The model does not know that your collar needs to stay intact, that your brand logo cannot be rotated 15 degrees, or that the fabric weave on your best-selling jacket must match the physical product. It is guessing, and when it guesses wrong, the result can damage your brand faster than a low-quality photo ever could.
Three failure modes show up repeatedly in community discussions:
Product deformation. Sleeves stretch, necklines warp, shoe shapes bend in ways that do not match any real manufacturing process. This happens because create-mode models treat your product as visual inspiration, not as a locked reference.
Logo and detail destruction. Brand logos get garbled, text becomes illegible, prints shift into unrecognizable patterns. For fashion and apparel SKUs where branding and print accuracy directly affect customer trust, this is often the dealbreaker.
Detail hallucination. The model invents textures, buttons, zippers, or design elements that do not exist on your actual product. A customer who orders based on a hallucinated detail will return the item, and on Amazon, returns hurt your listing rank.
What works instead is preserve-mode tools: ecommerce-specialized platforms that accept your product image as a locked reference layer, then generate new backgrounds, lighting, compositions, and scene contexts around it without reinventing the product itself. This is the technical foundation that makes hybrid workflows viable, and it is the reason sellers who switched from Midjourney to purpose-built tools report dramatically different results in community threads.
The Hybrid Workflow: A 5-Step Framework That Actually Works
The hybrid workflow is not a collection of tips. Each step feeds into the next, and skipping one tends to degrade the final output. Here is the framework that community consensus supports.
Step 1: Capture Clean Base Photos (The Foundation)
Everything in a hybrid workflow starts with base photos. These are real photographs of your actual product, shot under controlled conditions, that serve as the ground truth for every AI-generated variation that follows.
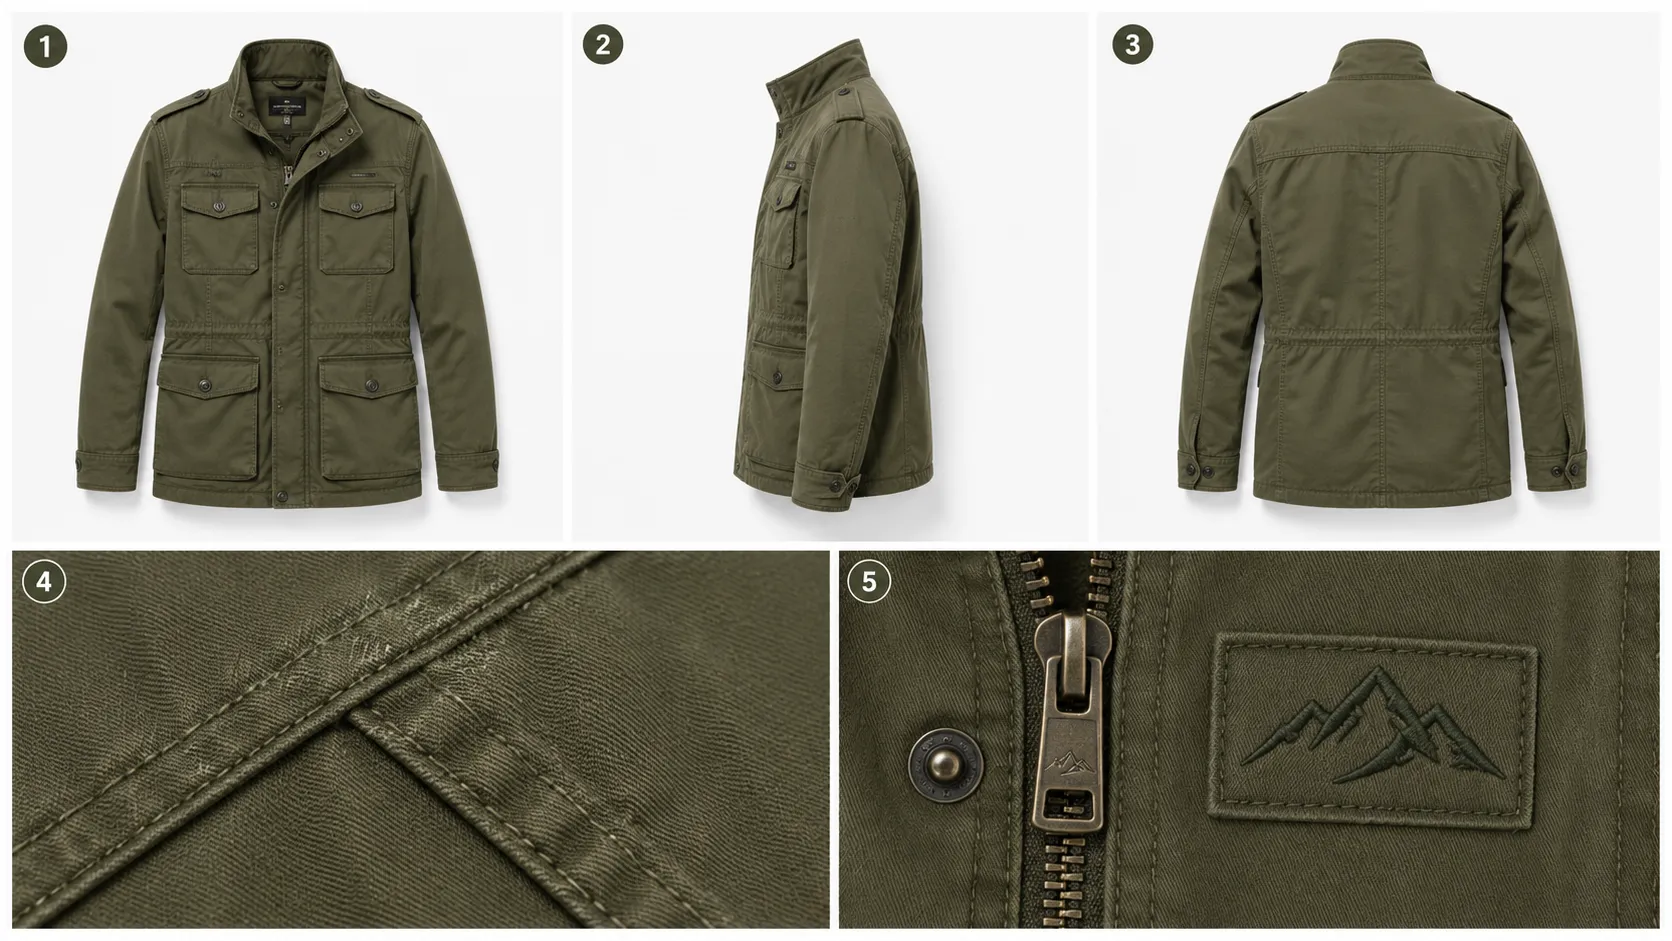
You do not need a professional studio for every SKU, but you do need consistency. Community-reported workflows suggest capturing 3–5 base angles per SKU at minimum: front view, side profile, back view, and one or two detail shots that show texture, print, or construction. For top-revenue SKUs, increase this to 8–12 angles to give the AI stage more reference material.
Lighting should be even and neutral. Harsh shadows or colored gels introduce variables that the AI stage may misinterpret. A plain white or light-gray background works best for base capture because it gives you maximum flexibility when generating variations later.
A Shopify apparel seller preparing a seasonal launch might schedule one base shoot for 20–30 SKUs in a single day, then feed those references into the AI variation stage over the following week. The upfront time investment pays off when each SKU can produce 10–20 usable variations from that single shoot.
Step 2: Remove Backgrounds Before AI Processing (Don't Skip This)
Before any AI tool touches your base photo, remove the background and produce a clean cutout. This step is frequently skipped, and it is a common reason AI outputs look amateurish.
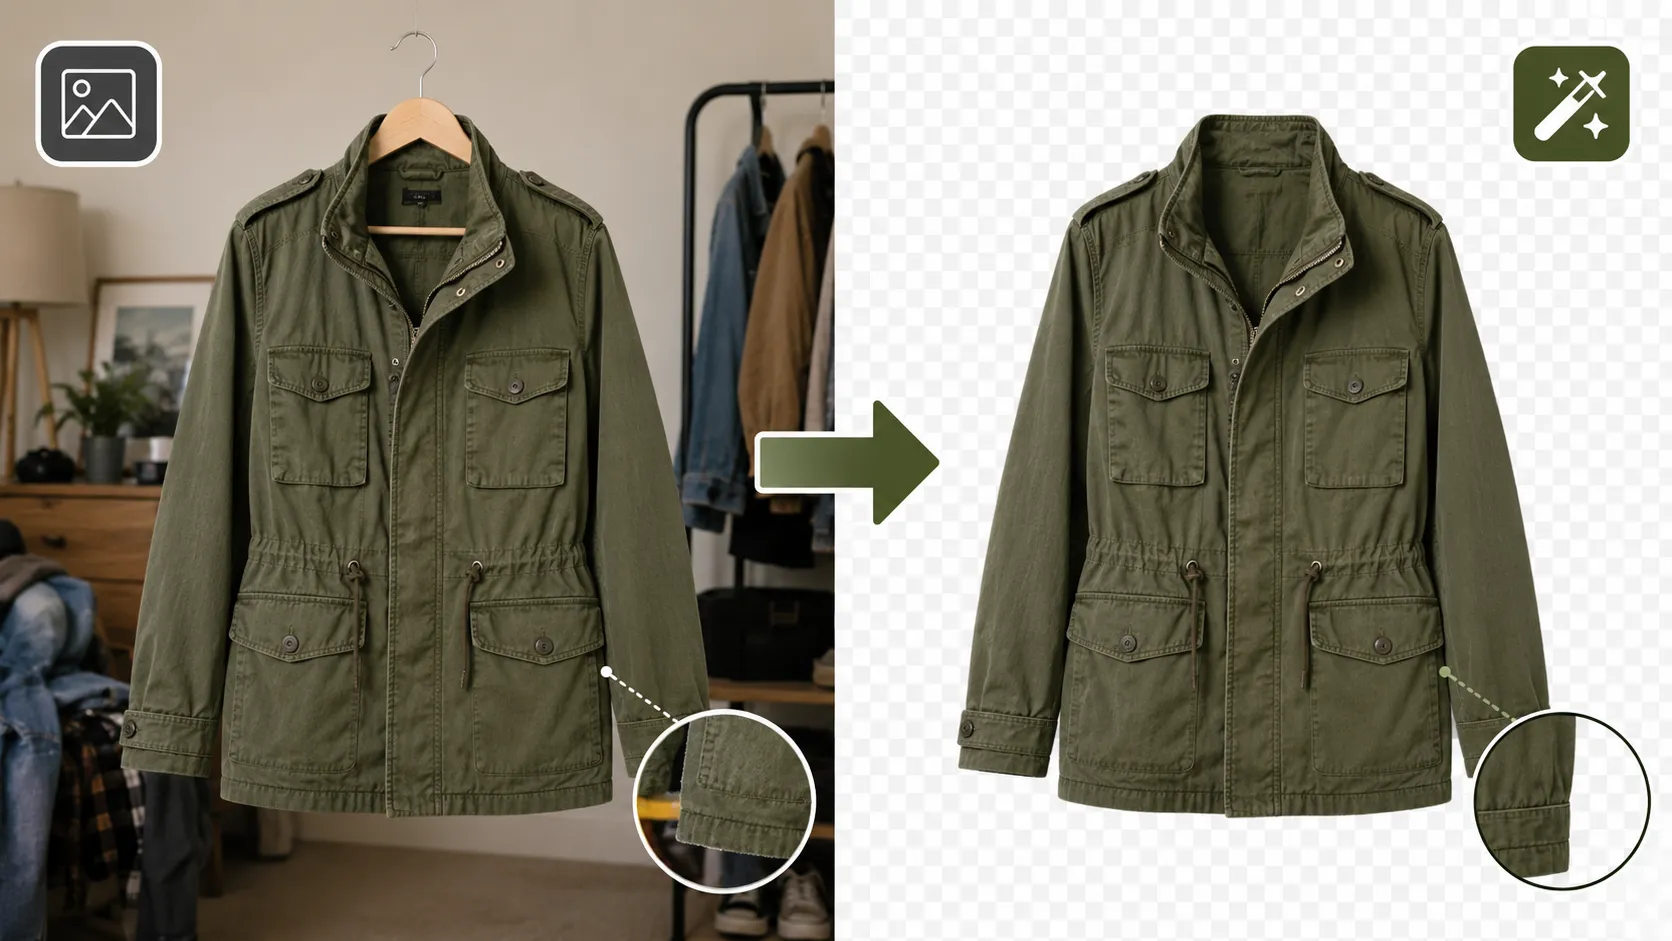
When you upload a photo with a messy or cluttered background into an AI generator, the model receives conflicting signals about what is the product and what is environment. Edge detection suffers, shadow artifacts bleed into the product area, and the generated composition inherits visual noise from your original shooting environment.
Use a dedicated background remover to clean product cutouts before AI processing. For texture-sensitive categories like knitwear, denim, or embroidered apparel, inspect the cutout edges closely — frayed edges or semi-transparent materials need manual touch-up after automated removal.
The output of this step should be a transparent-background PNG of your product, isolated cleanly, ready to serve as the locked reference layer for AI scene generation.
Step 3: Generate AI Variations Using Ecommerce-Specialized Tools
With clean cutout references in hand, the AI variation stage is where the hybrid workflow scales. This is also where tool choice determines whether you get commercial results or more deformed experiments.
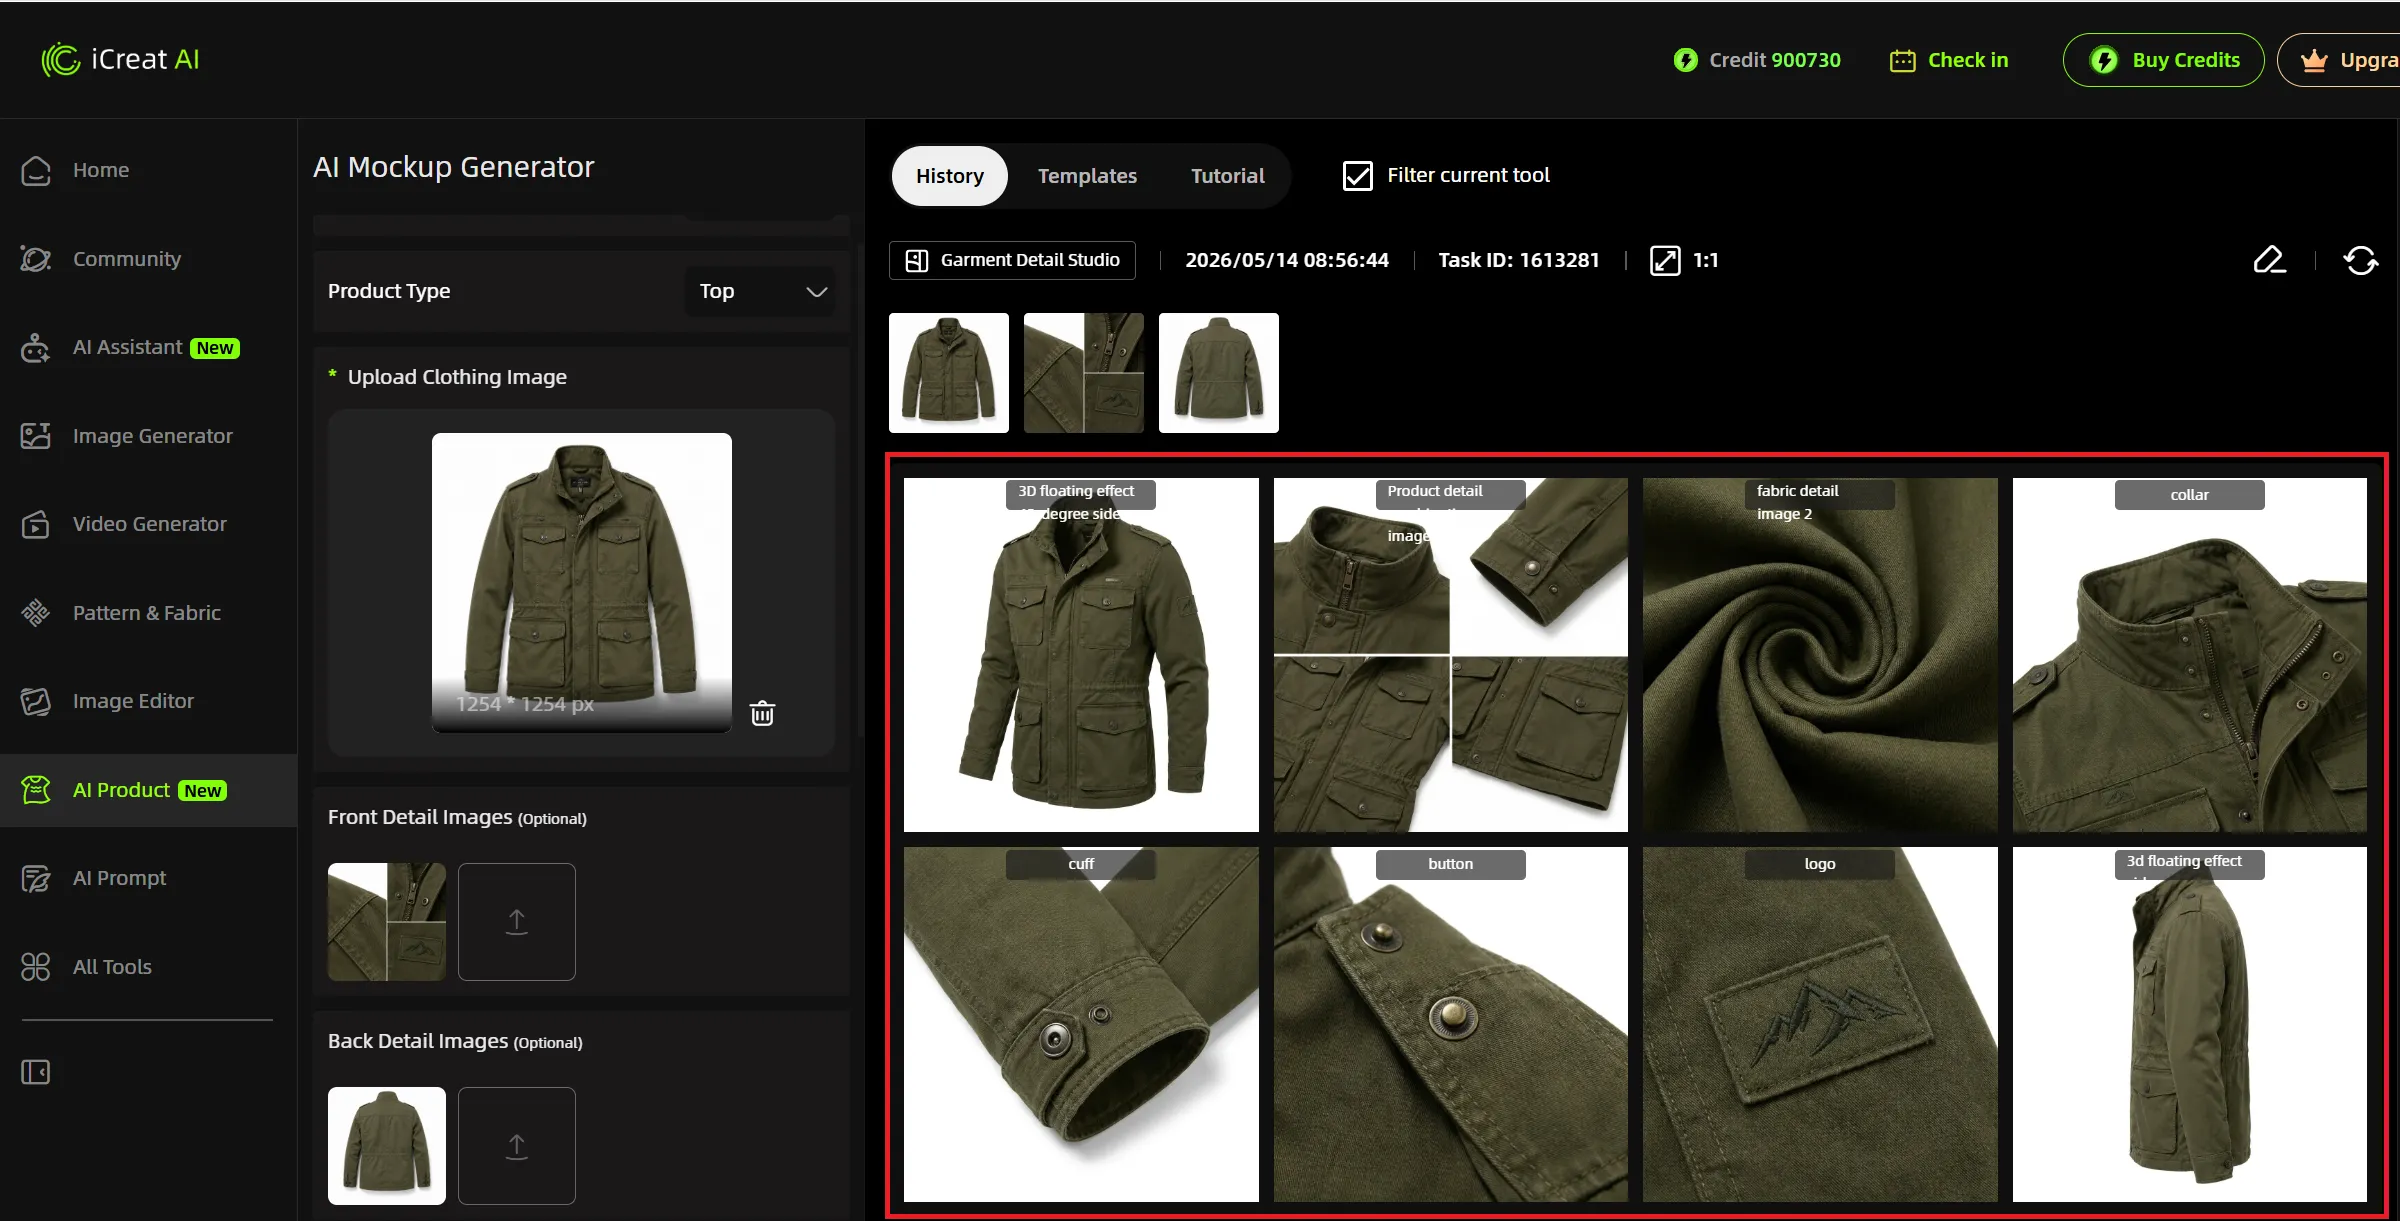
Ecommerce-specialized tools operate differently from general generators. They accept your product image as a reference input, lock the product layer (or strongly weight it), and generate new backgrounds, scenes, lighting setups, and compositional contexts around your actual product. Many of these tools also provide pre-built templates designed specifically for ecommerce use cases: lifestyle scenes, seasonal backgrounds, marketplace-ready layouts, and ad creative formats.
iCreat AI's AI Product Photography workspace uses this preserve-mode approach. You upload your reference images, select a template or write a prompt that describes the desired scene, and the system can generate product variations from your base photos that keep your product recognizable while placing it in new visual contexts. For a fashion team that just completed a base shoot, this stage can turn 30 reference photos into 300–600 candidate variations in a fraction of the time that traditional production would require.
Template systems matter here. Writing effective prompts for product photography is a skill that takes practice, and pre-built templates encode professional prompting knowledge so you do not start from zero.
Step 4: Run the QA Checklist (The Underrated Step)
Most hybrid workflow failures happen not during generation, but in the gap between generation and publication. Teams generate 50 variations, pick the ones that "look good" at thumbnail size, and push them live. Then they discover issues when customers zoom in or when marketplace reviewers flag the listing.
A systematic QA checklist prevents this. Review every AI-generated output against these six criteria before it goes live:
Color accuracy. Does the product color match your base reference within an acceptable tolerance? AI lighting changes can shift perceived color, especially for blacks, whites, and saturated hues. Compare the generated output side-by-side with the original.
Fabric texture and drape. Does the material look like the same fabric? Glossy finishes should stay glossy, matte should stay matte, and knit patterns should not become smooth. This is where hallucination shows up most often for apparel.
Logo position and clarity. Is your brand logo present, readable, and correctly oriented? Check letter spacing, proportions, and placement. Even small logo distortions signal low-quality execution to discerning buyers.
Product shape integrity. Are seams straight? Are sleeves proportional? Does the overall silhouette match your base photo? Zoom to 100% or higher for this check; shape issues hide at small preview sizes.
Lighting direction consistency. If you are producing multiple variations of the same SKU, does the apparent light source direction feel coherent across the set? Inconsistent lighting between images on the same product page looks unprofessional.
Shadow behavior. Do cast shadows make physical sense given the scene context? Floating products, impossible shadow directions, or missing contact shadows are immediate tells that an image is AI-generated.
Budget roughly 30–60 seconds per image for QA review. At that rate, reviewing 50 variations takes under an hour, and it prevents the costly cycle of publishing, getting customer complaints or returns, and pulling images down.
Step 5: Allocate Outputs to the Right Channels
Not every AI-generated image belongs in the same place. The allocation decision is where the hybrid framework meets your specific business context. A clear allocation strategy prevents both under-using AI (wasting budget on unnecessary reshoots) and over-using it (publishing AI output in positions where customers expect photographic authenticity).
Here is how to think about allocation:
- Hero / main PDP image: Real photography or AI-reviewed output that has passed strict QA. This is the first image a customer sees, and it sets quality expectations for everything else.
- Secondary PDP images (angles, details, lifestyle): AI-generated variations work well here, provided they pass the QA checklist. Use AI tools to produce PDP detail close-ups for fabric shots, 3D floating effects, and alternative angles.
- Long-tail SKU images: AI batch generation is appropriate for lower-volume SKUs where individual photoshoot ROI does not justify the cost. Apply the same QA standards, but accept that these images serve discovery rather than conversion-critical roles.
- Social media and ad creatives: AI-generated lifestyle scenes and campaign visuals are strong fits here. These placements benefit from variety and creative testing more than from absolute photorealism.
- Seasonal campaign refreshes: When you need to adapt existing successful visuals for a holiday, sale event, or new collection theme, use an AI image replacer to adapt your AI-generated visuals for new campaigns without reshooting.
The Allocation Matrix: Which Images Should Be Real vs AI-Generated?
Community discussions converge on a rough rule of thumb: your top 20% of revenue-generating SKUs deserve real or strictly-AI-reviewed photography, while the remaining 70–80% of your catalog can rely on AI-generated variations with standard QA. But revenue tier alone is not the only variable. Image type and use case matter too.
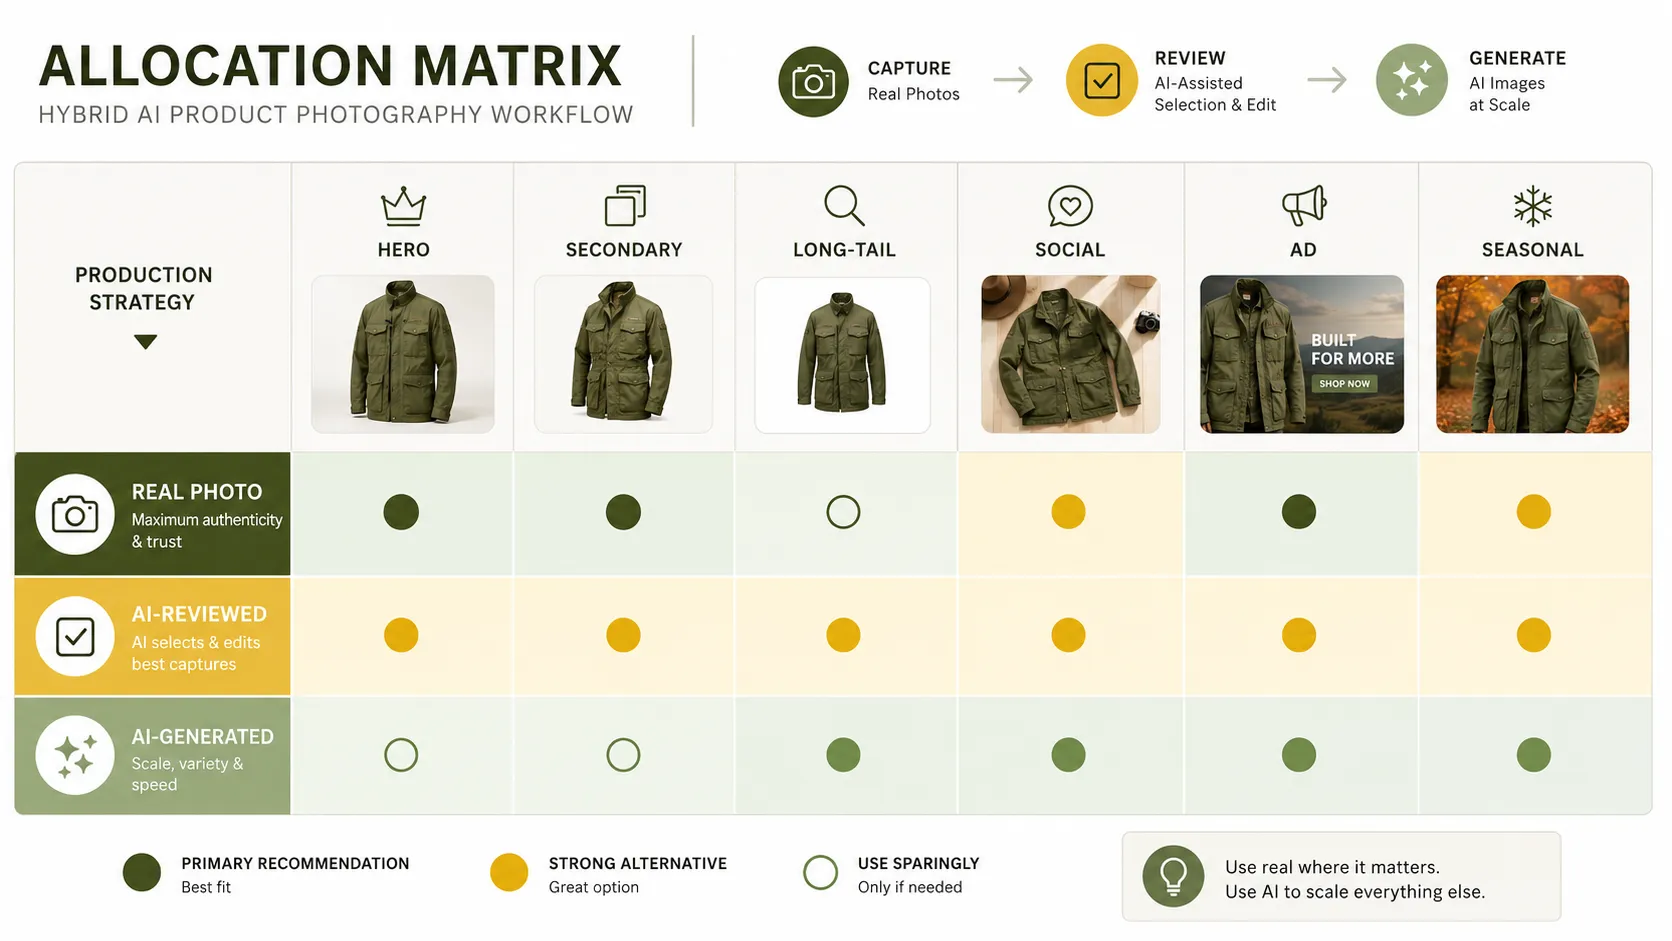
| Image Type | Recommended Approach | Rationale |
|---|---|---|
| Hero / main listing image | Real photo or AI-reviewed | First impression sets quality bar; Amazon and marketplace guidelines favor authentic representation |
| PDP secondary images (3–8 images) | Mix of real + AI-reviewed | Angles and details can be AI if QA passes; lifestyle scenes perform well as AI |
| Long-tail / low-volume SKU images | AI-generated with standard QA | Individual shoot cost exceeds expected return; AI fills the gap |
| Social media feed posts | AI lifestyle scenes | Engagement favors variety and emotional context over studio-grade photography |
| Paid ad creatives (Meta, TikTok) | AI variations for testing | Creative fatigue is real; AI enables A/B testing at scale without production bottleneck |
| Seasonal campaign visuals | AI-adapted from existing assets | Speed matters more than original capture for time-sensitive promotions |
| Wholesale / B2B line sheets | Real or AI-reviewed | B2B buyers scrutinize product accuracy more carefully than DTC consumers |
A fashion team managing 200 SKUs might photograph 40 top sellers traditionally, generate AI variations for the remaining 160, and still end up with a richer, more complete visual catalog than if they had photographed everything manually.
Ecommerce-Specialized Tools vs General AI Generators: Know the Difference
Understanding this distinction determines whether your first attempt at AI product photography succeeds or fails. Most of the frustration documented in community threads traces back to using the wrong tool category.
General AI generators (Midjourney, DALL-E, Stable Diffusion in their default configurations) are designed for creative image synthesis. You describe something, and they create it. They excel at concept art, illustrations, and imaginative visuals. They are not designed to treat your uploaded product photo as a sacred reference that must be preserved pixel-for-pixel.
Ecommerce-specialized tools are built around a different paradigm: reference-image-driven generation with product-layer preservation. They accept your product photo as the primary input, use it to anchor the output, and generate contextual variations (backgrounds, lighting, scenes, compositions) around the locked product. The technical approaches differ: some use image-to-image pipelines with high reference weighting, others use layered compositing with AI-generated context layers, but the shared principle is that your product stays recognizable.
For a seller deciding where to start, the practical implication is straightforward: if your goal is commercial product imagery, start with an ecommerce-specialized tool. Use general generators for mood boards, concept exploration, or creative brainstorming, but move to a purpose-built platform before producing publishable assets.
Lifestyle Scenes Beat Background Swaps for Conversion (Here's Why)
When sellers first try AI product photography, most start with background replacement: taking a white-background product photo and dropping it onto a gradient, solid color, or simple textured backdrop. It feels safe, fast, and controllable. And it does produce usable results for basic catalog needs.
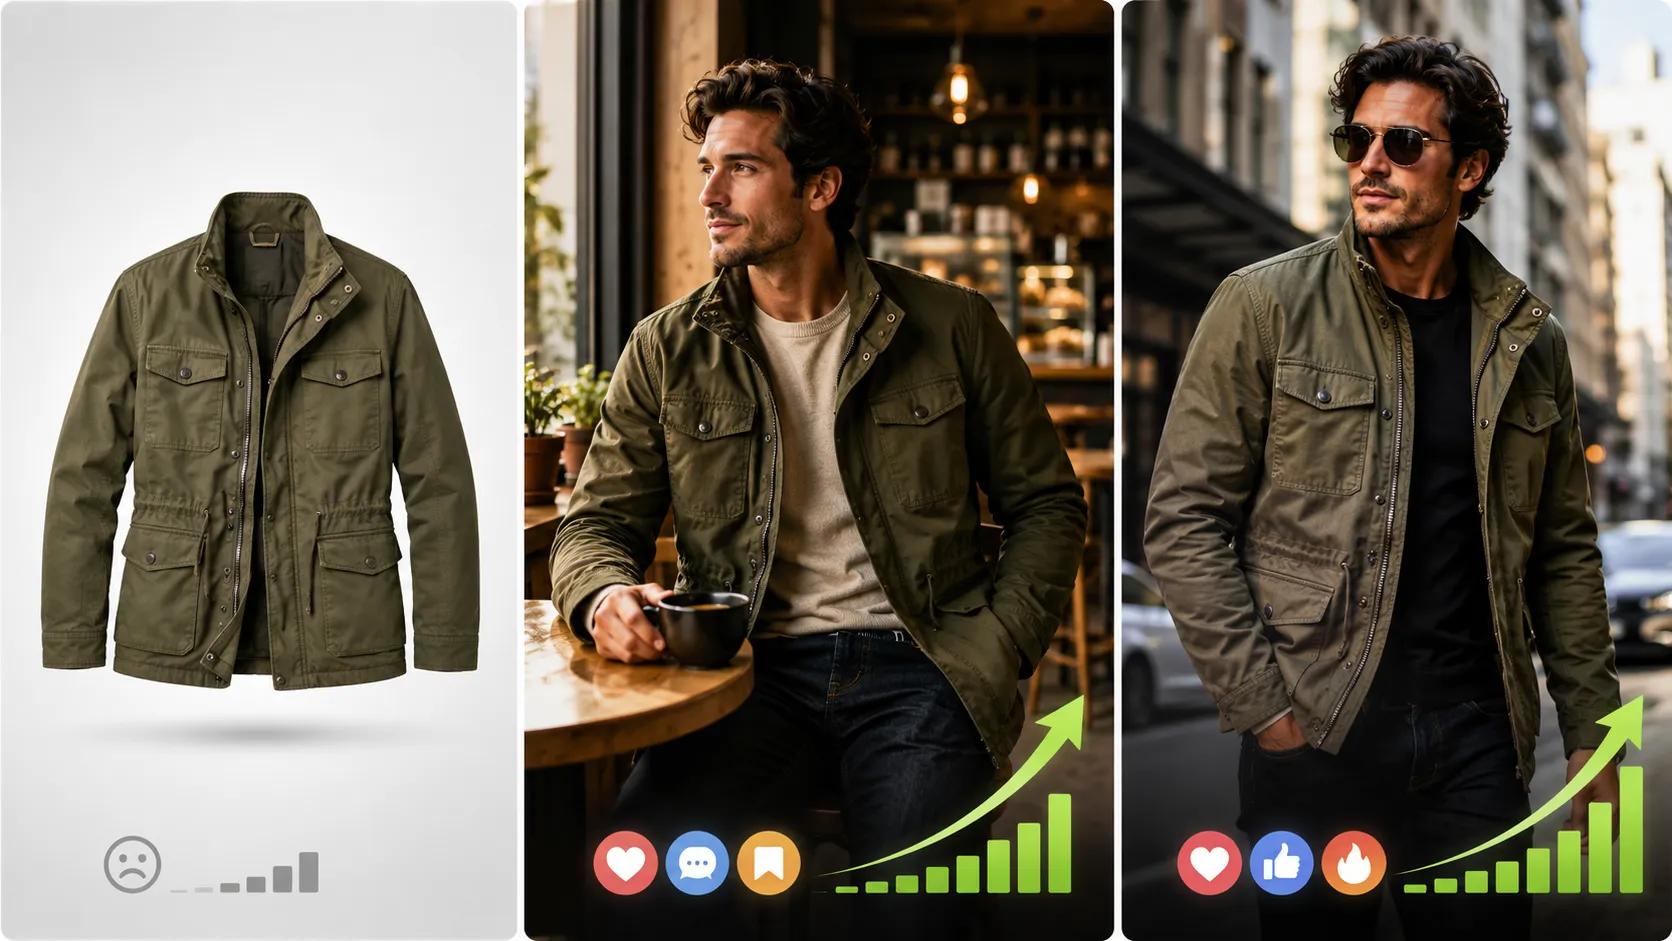
But community data from growth-hacking and CRO discussions consistently shows that lifestyle-context images outperform clean background swaps on social channels and in ad creative testing. The reason is emotional connection. A jacket floating on a gray gradient communicates product existence. The same jacket shown in a cafe setting, on a city street, or in a styled room context communicates how the product fits into the buyer's life.
Lifestyle scenes do not require a real model or location photoshoot when produced through AI. With the right reference inputs and template selection, you can create lifestyle campaign visuals that place your product in editorial-style contexts. Choose templates that match your brand aesthetic. A luxury outerwear brand needs different lifestyle contexts than a streetwear label or a performance athletic line.
Practical advice: allocate 60–70% of your AI generation budget to lifestyle and contextual scenes, and reserve background swaps for marketplace listing requirements where clean backgrounds are mandatory.
The Consumer Trust Factor: Why Quality Control Matters More Than Ever
Consumer ability to detect AI-generated imagery is improving, and the backlash is no longer theoretical. Discussions on Amazon-focused forums (including one thread with over 244 upvotes) document growing customer frustration with product listings that contain physically impossible details: items floating with no support, shadows pointing in wrong directions, text that dissolves under close inspection.
This is not a reason to avoid AI. It is a reason to apply quality standards that account for increasingly sophisticated consumer scrutiny. The sellers who attract negative attention are not the ones using AI thoughtfully. They are the ones publishing raw AI output without QA, without cutout preparation, and without regard for whether the result passes a basic "does this look real" test.
A quality-focused hybrid workflow protects you from this problem. Because you start with real base photography, run systematic QA, and allocate AI output to appropriate channels, your AI-assisted visuals are significantly harder to distinguish from traditional photography than the raw outputs that are drawing complaints.
The practical standard emerging from community discussions: if you cannot tell whether an image is AI or real at normal viewing size without zooming in and scrutinizing, it is probably good enough for most ecommerce contexts. If the AI nature is immediately obvious, it needs more work or should be relegated to lower-stakes placements.
Common Mistakes That Kill Hybrid Workflow ROI
Based on community-reported experiences, these are the recurring errors that waste time, money, and trust:
Using the wrong tool category. Starting with a general-purpose AI generator instead of an ecommerce-specialized tool. This accounts for the majority of first-time failures and is completely avoidable with the right tool choice.
Skipping background removal. Uploading photos with original backgrounds into AI tools and wondering why edges look jagged or shadows behave strangely. The two-minute cutout step saves hours of revision later.
Running insufficient base photos. Trying to generate 20 variations from a single low-quality phone snapshot. The AI stage can only work with what you give it, and thin reference material leads to hallucination and inconsistency.
No QA process. Publishing AI output after a quick glance at thumbnail size. Every image that goes live should pass the six-point checklist described in Step 4.
Unlimited revision loops. Regenerating the same image 15 times hoping it will eventually be acceptable. One community-reported case study building an AI photography service found that revision cycles were their single largest hidden cost. Set a regeneration limit (three to five attempts), and if the output is not usable, move to a different template, prompt, or base photo.
Ignoring texture-sensitive SKUs. Applying the same workflow to a solid-color T-shirt and an intricately patterned silk scarf. Textured, printed, and translucent materials need extra care at both the cutout and QA stages.
No A/B testing. Assuming that AI-generated variations will automatically perform as well as or better than existing creative. Test AI output against your current best performers before scaling spend.
Treating all channels the same. Using identical AI output for your Amazon hero image, Instagram feed post, and Facebook ad creative. Each placement has different quality expectations and optimization criteria.
FAQ
Do I need professional photography skills for the base photos?
You need competence, not professionalism. A clean, well-lit photo captured with a recent smartphone camera can work as a base reference if the product is in focus, evenly lit, and shot against a neutral background. Professional photography helps, especially for top-SKU hero images, but it is not a prerequisite for starting a hybrid workflow. The AI stage does more heavy lifting when your base photos are good, but it can work with adequate amateur captures for non-hero applications.
How many base photos do I need per SKU?
Plan for three to five minimum: front view, back view, side profile, and one or two detail shots showing texture or unique features. For your top 10–20% revenue SKUs, aim for eight to twelve base angles. More reference material gives the AI stage more visual information to work with and reduces the chance of detail hallucination. If you only have one or two base photos per SKU, prioritize capturing more before scaling AI generation.
Can I use Midjourney or DALL-E for product photography?
You can, but you should expect deformation, logo issues, and detail inconsistencies unless you are using advanced techniques like inpainting, control nets, or image-to-image with very high reference weighting. For most ecommerce sellers, the learning curve and revision time outweigh the benefits compared to starting with an ecommerce-specialized tool that handles product preservation natively. Use general generators for concept exploration and mood boards, and switch to a purpose-built tool for publishable product visuals.
How do I know if my AI output is good enough to publish?
Run it through the six-point QA checklist: color accuracy, fabric texture, logo integrity, shape consistency, lighting coherence, and shadow behavior. Then apply the "normal viewing size" test: if a typical customer looking at the image at standard size would notice something off, it needs more work. If it passes both checks, it is likely suitable for its intended channel. Reserve the strictest standards for hero images and marketplace listings; social and ad creative can tolerate slightly more stylistic interpretation.
What is the realistic time savings from a hybrid workflow?
User reports from ecommerce community discussions suggest catalog build time reductions of around 80% compared to fully manual photography workflows when the hybrid system is established and running. The initial setup (base shoot, cutout batch, template selection) takes real effort, but once the pipeline is configured, generating 50 variations from existing references takes minutes rather than days or weeks of coordination with photographers, models, and studios.
Should I tell customers my images are AI-generated?
There is no universal legal requirement to disclose AI-generated product imagery in most jurisdictions as of 2026, though regulations vary by region and platform. Amazon Seller Central and Shopify have published guidance on AI content disclosure that you should review for your specific situation (Amazon guidelines, Shopify resources). From a brand-trust standpoint, the stronger position is to produce AI-assisted visuals that meet quality standards regardless of disclosure: if the output is good enough that customers do not question it, the disclosure question becomes less urgent.
How does this work for fashion and apparel vs general products?
Fashion and apparel are among the best-fit categories for hybrid AI workflows because clothing benefits enormously from variation quantity (different poses, scenes, seasonal contexts) and because garment details (texture, drape, print, logo) are well-preserved by reference-image-driven tools. General hard goods (electronics, home goods, accessories) also work, but the QA priorities shift: for apparel, focus on fabric and fit accuracy; for hard goods, focus on dimensional correctness, surface finish, and color fidelity. Some categories like jewelry and transparent or highly reflective products require additional care at the cutout and lighting-matching stages.
Putting This Into Practice
A hybrid workflow for AI product photography is not about choosing between real photography and AI. It is about using real base photos as the foundation and AI as the variation engine that extends what one shoot can produce. The sellers getting consistent results are the ones who treat this as a pipeline: clean capture, proper cutout, the right tool category, systematic QA, and smart channel allocation. That approach beats treating AI product photography as a one-off experiment with a generative tool.
The framework in this guide reflects what is working now, based on community validation across dozens of threads and thousands of seller experiences. Start with your top SKUs, establish the five-step process, measure which variations perform best in your specific context, and scale from there.
If you are ready to implement the AI variation stage of this workflow, log in to iCreat AI and start your hybrid workflow. For teams that want to extend static product visuals further, you can also turn your best static outputs into short-form video or upscale final assets to marketplace resolution before publishing.