



You can create professional-looking product photos for an online store without access to a photo studio. Two realistic paths exist: build a budget-friendly DIY setup at home using basic equipment, or use AI product photography tools that generate visuals from reference images without requiring a camera at all. Many sellers end up combining both approaches -- shooting one clean reference photo and letting AI handle the rest.
Not every seller has a studio, professional lighting, or photography training. But every online store needs quality product images to compete. Shoppers judge products based on what they see on screen, and listings with clear, well-lit photos tend to perform better than those with blurry or inconsistent visuals. This guide covers practical DIY approaches for when you want to shoot yourself, explains how AI product photography can generate visuals from a single reference image, and helps you decide which method (or combination) fits your situation.
Key Takeaways
- You can create usable product photos for an online store without a studio using DIY setups starting under $100 or AI generation tools that work from a single reference image
- DIY photography works well for hero shots and reference images when you have basic equipment and natural light
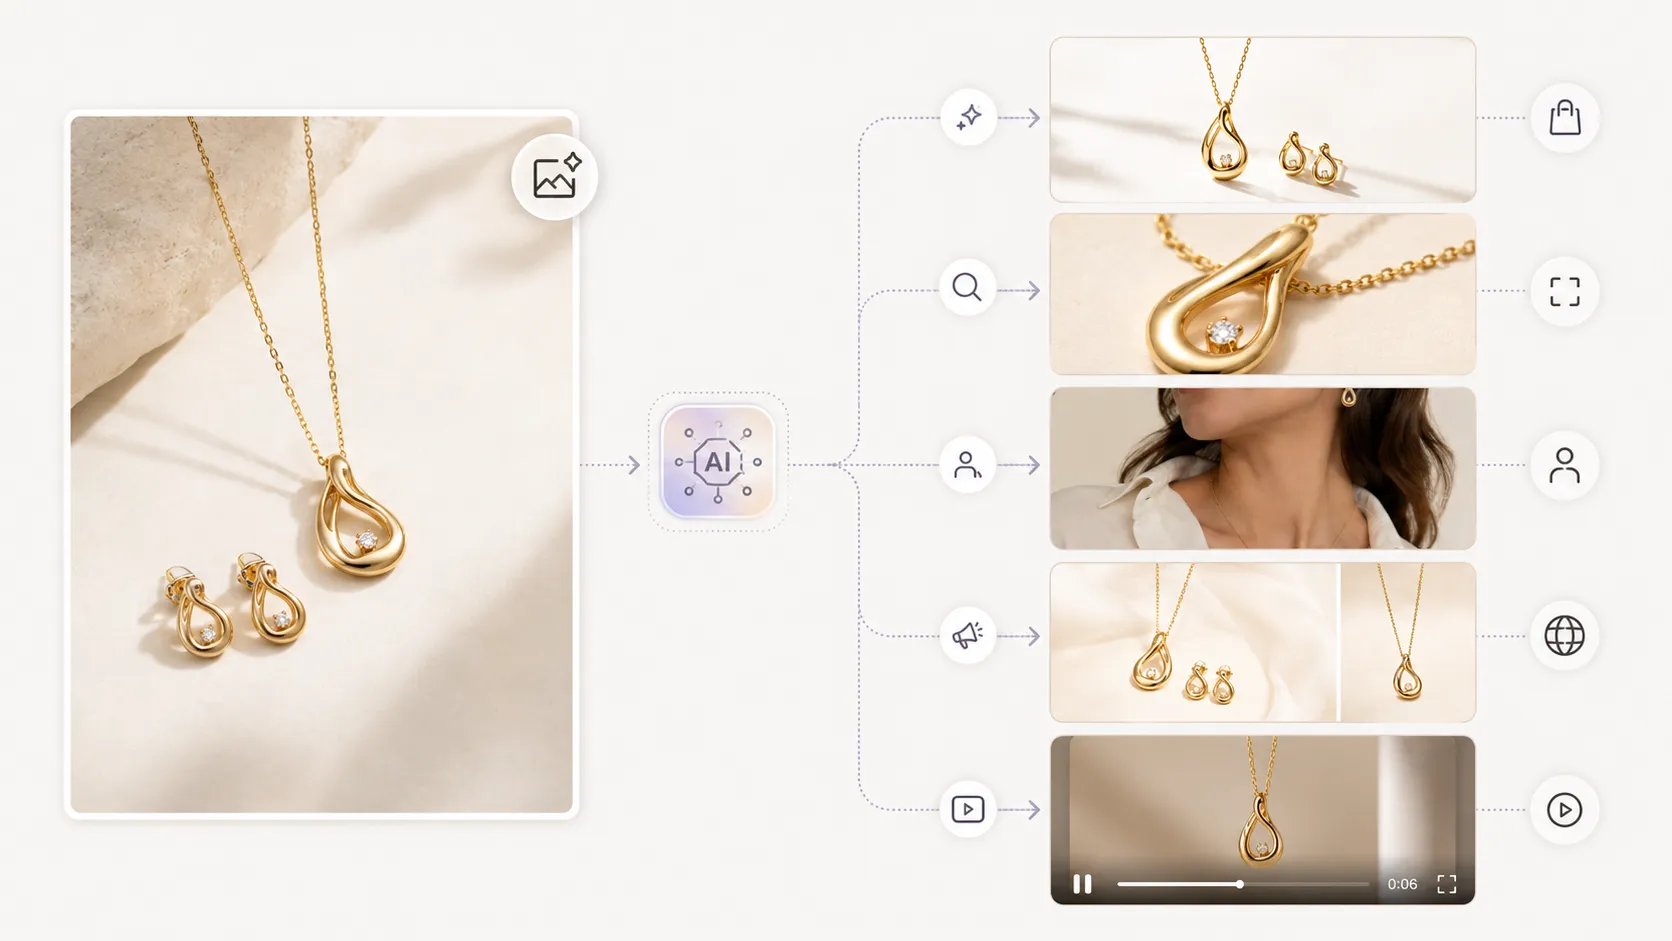
- AI product photography can expand one reference image into multiple product visuals, background variations, and campaign assets without additional shooting
- For fashion and apparel sellers, preserving garment details like logos, prints, and fabric texture matters whether you shoot yourself or use AI
- The best approach for most small online stores combines a simple DIY reference photo with AI-powered visual generation for scale
Why Your Online Store Needs Quality Product Photos (Even Without a Studio)
Product images are the closest thing a shopper has to touching, holding, or trying on your item. According to ecommerce UX research from sources like the Nielsen Norman Group and Baymard Institute, high-quality product imagery directly influences whether visitors add items to their cart or leave the page. The specific numbers vary by study, but the pattern is consistent across platforms: clearer photos lead to stronger shopper confidence.
Most ecommerce platforms and marketplaces have image expectations. Amazon Seller Central requires a white-background main image with minimum resolution standards. Shopify's own guidance recommends multiple angles, close-ups, and lifestyle context. Etsy emphasizes clarity and detail for handmade goods. Even if you are not aiming for perfection, meeting basic visual standards separates serious sellers from listings that shoppers scroll past.
The practical reality is this: a product listing with one grainy photo taken in dim room lighting will struggle against a competitor listing with five clean shots showing the item from multiple angles. You do not need a studio to close that gap. You need a deliberate approach to either shooting or generating visuals that look intentional and trustworthy.
Option 1: DIY Product Photography Setup on a Budget
What you actually need
DIY product photography does not require thousands of dollars in gear. At minimum, you need four things:
- A camera or smartphone -- A modern smartphone camera is sufficient for most online store product photos. Phone cameras from the last three to four years can capture sharp, well-exposed images when used correctly.
- A light source -- Natural window light costs nothing. A basic ring light or softbox adds control.
- A backdrop -- A plain white wall, a sheet of paper, or a fabric sweep.
- A stable surface or tripod -- Keeps framing consistent and eliminates blur from shaky hands.
That is the full list. Everything else is optional refinement.
Lighting options ranked by cost
Lighting makes the biggest difference between amateur-looking and usable product photos. Here are three tiers:
Window light (free). Place your product near a large window on an overcast day or in open shade. Diffused natural light creates soft shadows and accurate colors without any equipment cost. This works surprisingly well for flat-lay product shots and is how many successful Shopify sellers started.
Ring light ($30-$80). A ring light mounted above or in front of your product provides even, direct illumination. It reduces harsh shadows and works regardless of weather or time of day. Ring lights are widely available and easy to position for small-to-medium products.
Softbox kit ($80-$300). One or two softboxes with stands give you studio-quality directional light with soft shadow transitions. This tier makes sense if you shoot regularly and want consistent results across dozens of SKUs. It is still far cheaper than hiring a photographer.
Backdrop options
Your background should not distract from the product. Practical choices include:
- Paper sweeps: Seamless paper rolls in white, gray, or black cost under $20 and give a clean, professional look.
- Fabric: Plain cotton or muslin draped over a surface works well and can be washed and reused.
- Foam board: Inexpensive, rigid, and reflective enough to bounce light back onto your product.
- Portable pop-up backdrops: Foldable options that set up in seconds, useful for sellers with limited space.
Composition basics
Keep these principles in mind regardless of equipment level:
- Shoot from multiple angles: front, back, side, top-down (for flat lays), and at least one detail close-up.
- Use consistent framing across all products in the same catalog so your store looks cohesive.
- Leave some negative space around the product so the image does not feel cramped.
- For smaller items, fill the frame rather than shooting from too far away.
Budget tier breakdown
| Tier | Cost | What you get | Best for |
|---|---|---|---|
| Starter | $0-50 | Window light + white wall/floor + smartphone | New sellers testing their first listings |
| Mid-range | $50-200 | Ring light + pop-up backdrop + tripod + smartphone | Sellers who want consistent, repeatable results |
| Serious | $200-500 | Softbox kit + proper backdrop stand + entry DSLR/mirrorless | High-volume SKU catalogs or brands building visual consistency |
Limitations of DIY photography
DIY product photography has real constraints. Each SKU takes time to prep, light, shoot, and edit. Learning to get consistent results takes practice. Natural light depends on weather and time of day. Creating creative variation -- different backgrounds, seasonal themes, lifestyle contexts -- usually means reshooting or heavy editing. For a seller with twenty products, DIY is manageable. For a seller with two hundred products and seasonal campaign needs, DIY alone becomes a bottleneck.
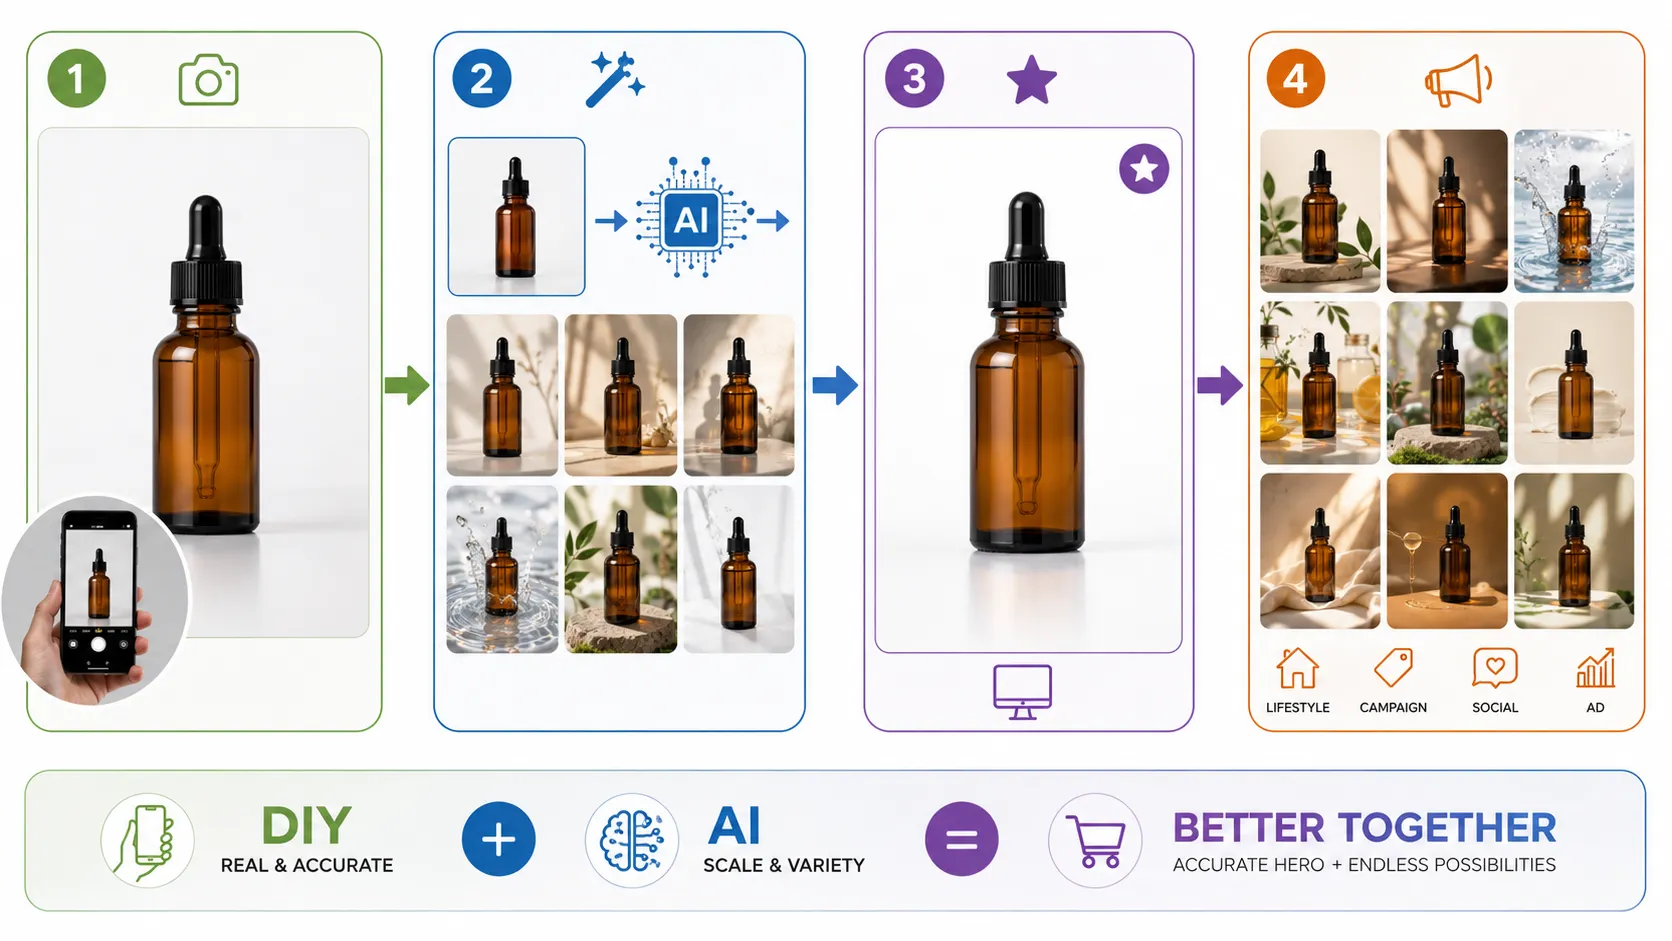
Option 2: AI Product Photography -- Skip the Studio Entirely
AI product photography uses image generation models to create product visuals from reference images and text prompts, without organizing a traditional photoshoot. You upload a photo of your product (even a basic phone shot), describe the type of image you want, and the tool generates output that can include white-background product images, lifestyle scenes, campaign backgrounds, social media creatives, and ad-ready variations.
This approach addresses the core problem differently than DIY. Instead of improving your physical setup, it changes the production workflow entirely: one reference input becomes multiple visual outputs.
How it works in practice
The typical workflow follows three steps:
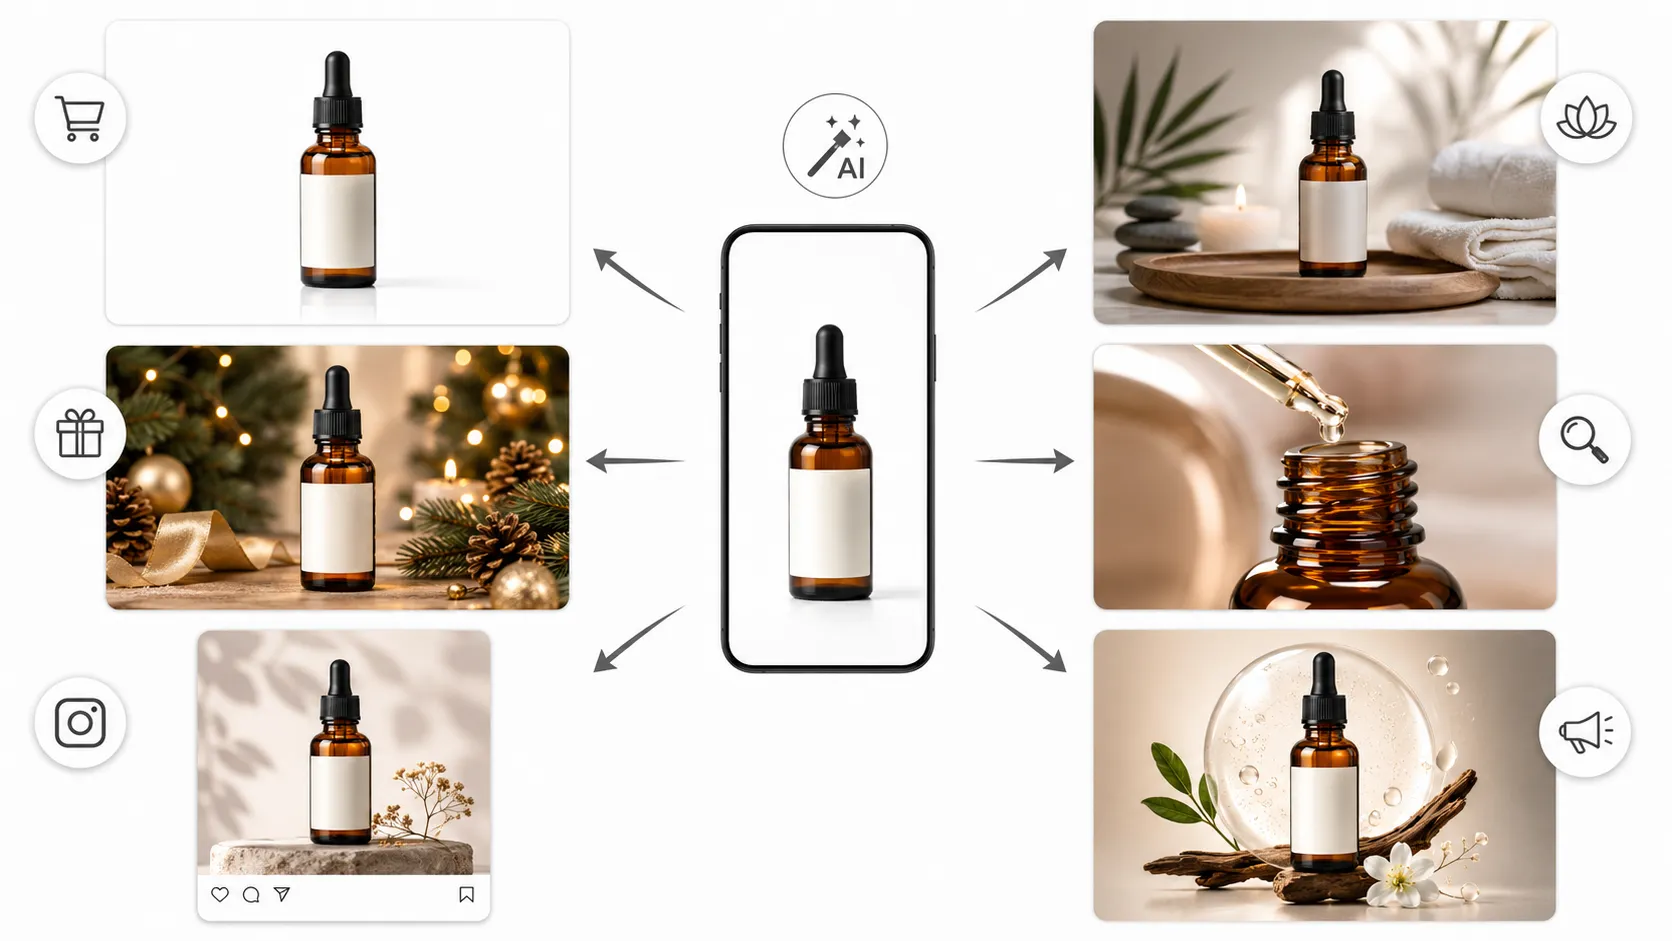
- Upload a reference image. This should be the clearest photo you have of your product. It does not need to be perfect, but it should show shape, color, and important details accurately.
- Describe what you want. Write a prompt specifying the scene, lighting style, mood, background, and composition. More specific prompts generally produce more targeted results.
- Generate and select. The AI produces one or more image variations. Review them for product accuracy, choose the strongest outputs, and use them for your store, ads, or social channels.
Types of visuals AI can generate from one reference
From a single product photo, AI tools can produce:
- White-background product images for marketplace listings and clean catalog presentation
- Lifestyle and contextual scenes showing the product in use or in a styled environment
- Seasonal campaign backgrounds adapted for holidays, collections, or promotions
- Social media and ad creatives in different aspect ratios and styles
- Multiple format variations optimized for different platform requirements
For sellers who need volume and variety, this is where AI becomes valuable. One reference image can become ten or more usable outputs without additional shooting time.
When AI makes sense for your store
AI product photography is a strong fit when:
- You have a high number of SKUs and cannot shoot each one extensively
- You need seasonal or promotional variations without scheduling new shoots
- You want to test different background styles for paid ad creatives
- Your products are relatively standard in shape and do not require complex physical texture verification
- You already have at least one decent reference image per product
You can generate product photos with AI by uploading a reference image and guiding the output with prompts. The process typically takes minutes per generation, compared to thirty minutes to several hours per SKU for a full DIY shoot-and-edit cycle.
DIY vs AI: Which Approach Fits Your Situation?
Neither approach is universally better. The right choice depends on your products, volume, skills, and goals. Here is a framework to help you decide:
| Factor | DIY Photography | AI Product Photography |
|---|---|---|
| Upfront cost | $0-$500+ depending on equipment tier | Subscription-based, no equipment needed |
| Time per SKU | 30 minutes to 2+ hours (shoot + edit) | Minutes per generation |
| Skill required | Learning curve for lighting, composition, editing | Minimal technical skill; prompt writing improves with practice |
| Output control | Full creative control over every pixel | Guided by prompts and reference inputs; some variability |
| Variation speed | Slow (each new look requires reshooting or re-editing) | Fast (regenerate new variations from same reference) |
| Best for | Hero shots, unique handmade items, products where physical texture is critical | Scaling content, creating variations, generating lifestyle scenes |
Scenarios where DIY wins
Choose DIY (or hire a local photographer) when:
- Your product is handmade, one-of-a-kind, or has unique physical texture that must be captured exactly
- You are building brand identity through a very specific visual style that you control completely
- You sell items where shoppers need to verify material quality, stitching, weight, or tactile properties
- You enjoy the photography process and want full ownership of your visual production
Scenarios where AI wins
Choose AI product photography when:
- You manage a large catalog and need to produce visuals efficiently
- You run seasonal campaigns and need quick background or style variations
- You test multiple ad creative concepts and need volume over perfection
- You want lifestyle context images but do not have access to models, props, or locations
- Your budget does not allow for professional photography but your listings need more than phone snapshots
The hybrid approach: combine both methods
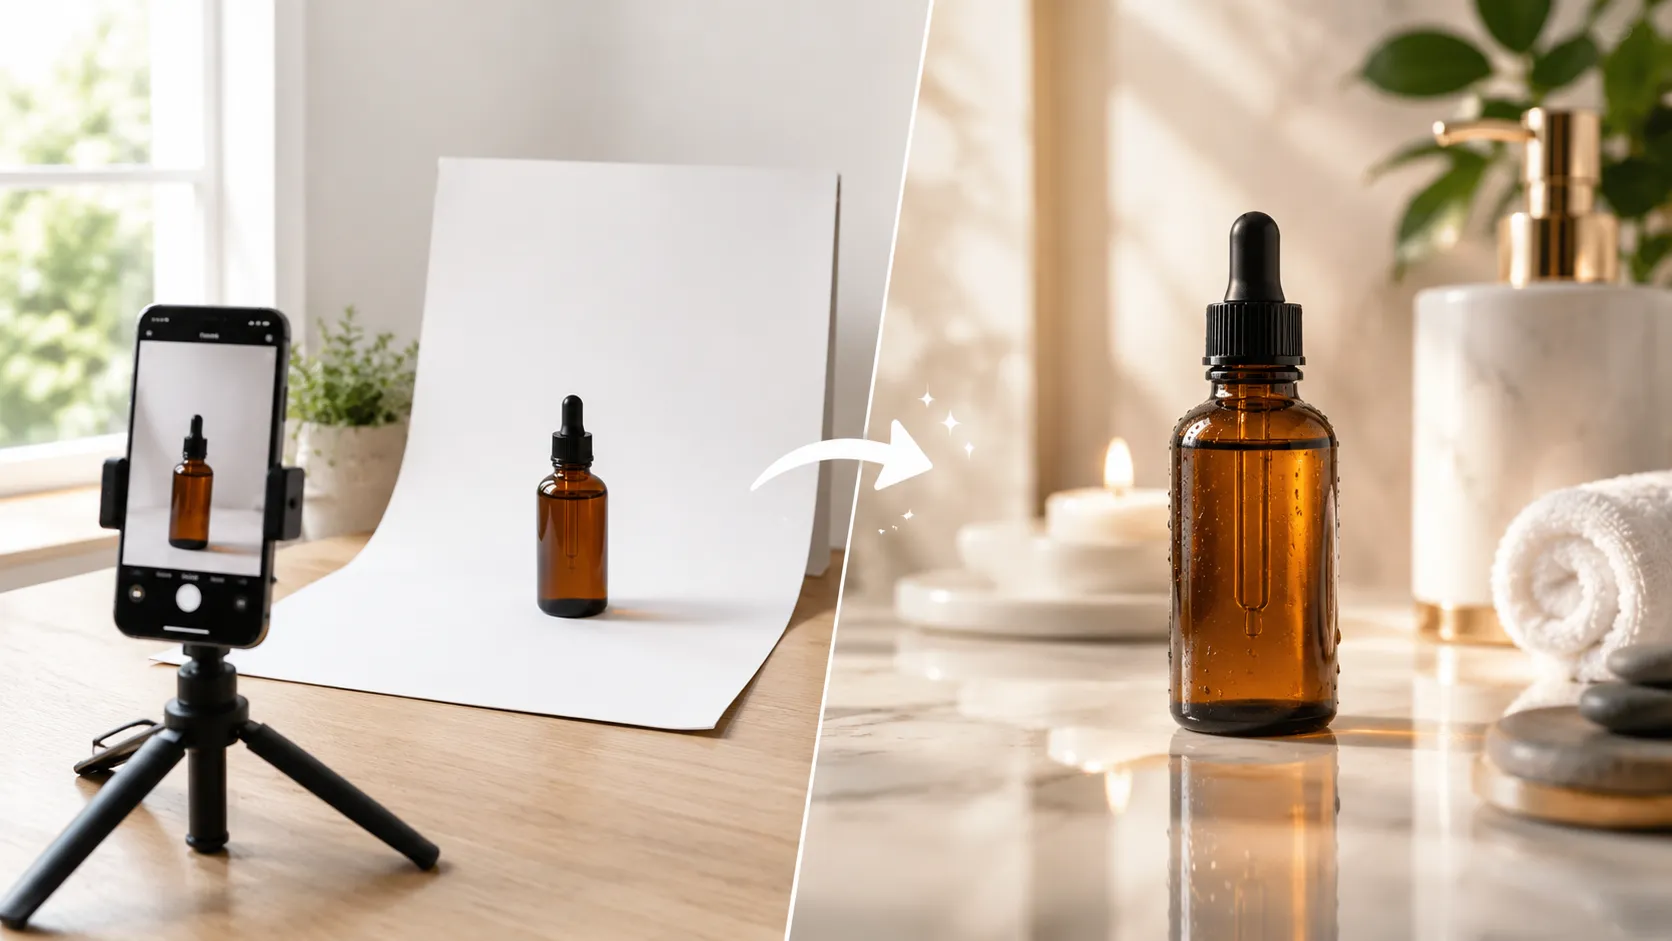
Many sellers find the best results come from combining DIY and AI. The workflow looks like this:
- Take one clean DIY reference photo of each product using basic window light or a ring light
- Use that reference as the input for AI product photography to generate all other visuals
- Keep the DIY shot as your hero image (where accuracy matters most)
- Use AI-generated outputs for lifestyle scenes, campaign variations, social content, and ad creatives
This approach gives you the accuracy of a real photograph where it counts, plus the speed and variety of AI for everything else.
Practical Workflow: Getting Great Results With or Without a Studio
If you are shooting DIY
Follow this workflow for each product:
- Prepare the product. Clean it thoroughly, steam or iron out wrinkles (especially for clothing), remove dust or fingerprints, and check for any visible defects before shooting.
- Use the simplest lighting setup that works. Window light is often enough for starting out. Position the product so light falls evenly across it without harsh hotspots or deep shadows.
- Shoot multiple angles. Capture at minimum: front view, back view, one side angle, one detail close-up, and one context shot (flat lay or in-use). These give you raw material for both your main listing and future AI generation.
- Keep framing consistent across SKUs. If you shoot all products at the same distance and angle, your catalog will look more professional and cohesive.
- Edit minimally. Crop to clean up composition, adjust exposure if the image is too dark or bright, and remove the background if you need a transparent or white-back version. Tools like Background Remover can help clean up DIY shots quickly.
- Save your best shot as the AI reference. Even if you only use DIY for your hero image, having a clean reference opens the door to AI generation later.
If you are using AI product photography
Follow this workflow for better results:
- Start with the best reference image you have. Even a decent smartphone photo can work as long as the product is clearly visible, in focus, and well-lit. Blurry or dark references will limit output quality.
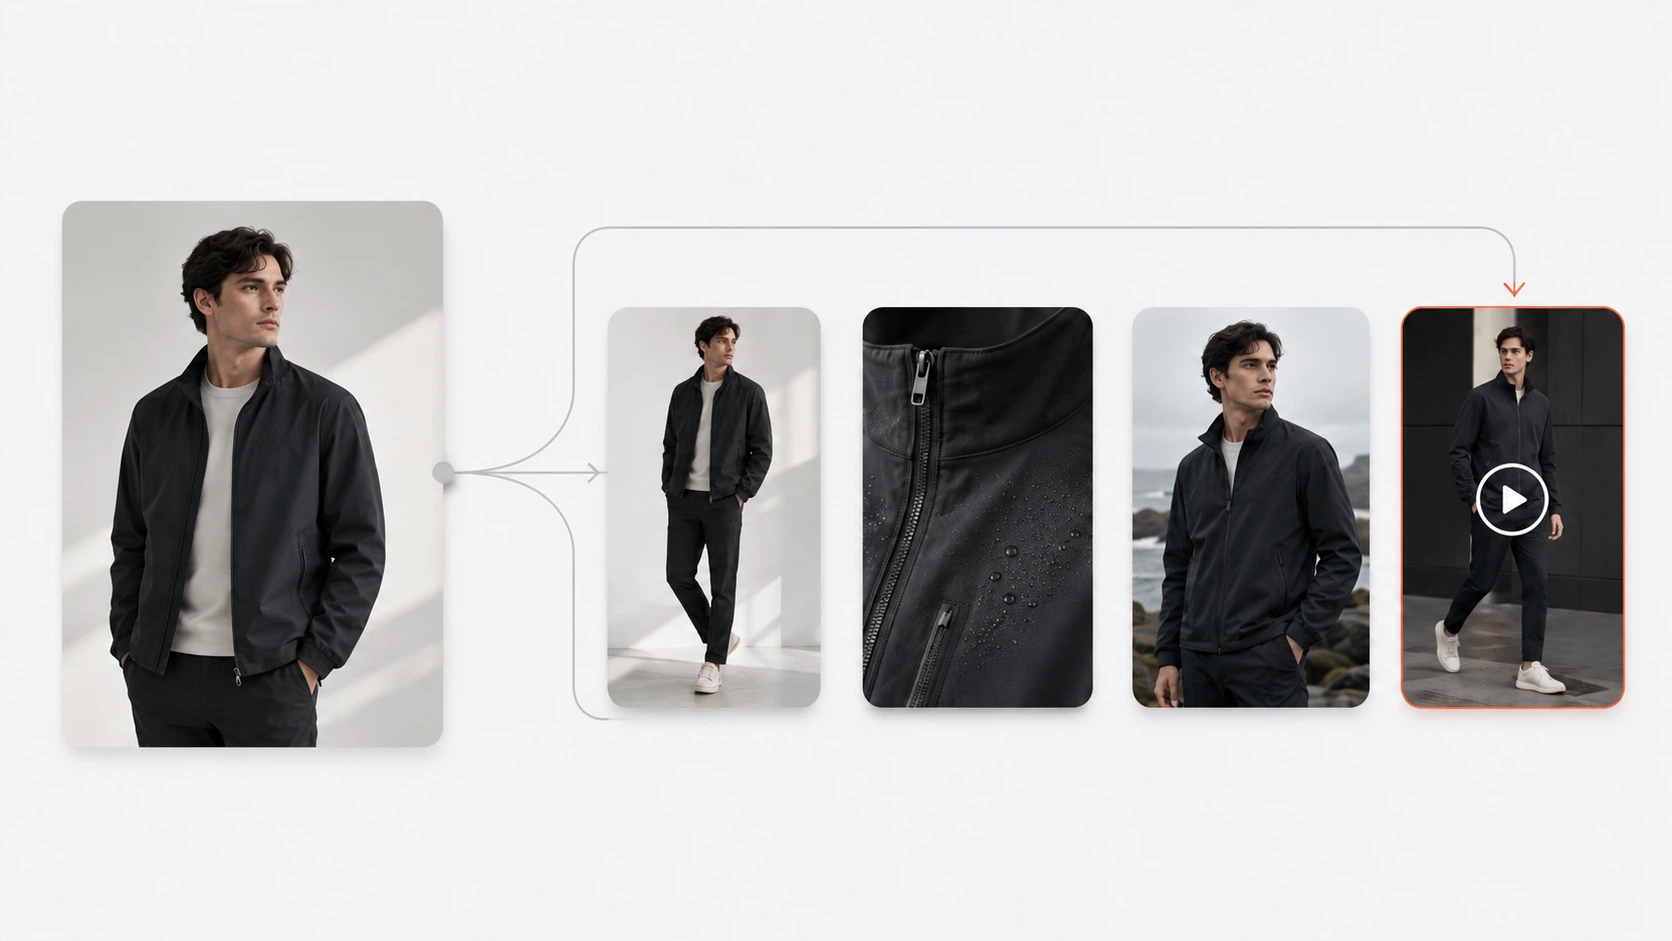
- Include a detail shot if garment accuracy matters. For clothing, upload a secondary image showing collar, logo, print, fabric texture, or seams. This gives the model more information to work with.
- Write clear, specific prompts. Instead of "make it look good," try "white background, soft studio lighting, centered composition, product facing slightly left." Specify scene, lighting style, mood, and layout.
- Generate multiple variations and compare. Produce several outputs from the same reference and prompt, then select the ones where product shape, color, and key details are most accurate.
- Review for product accuracy before publishing. Check that logos, prints, colors, and overall product appearance match your actual item. This step is especially important for fashion and apparel.
- Use supporting tools for final preparation. An Image Upscaler can improve resolution for larger display formats. For workflows where garment detail is critical, a model like Nano Banana Pro is designed for stronger detail restoration and higher-quality commercial visuals.
For Fashion and Apparel Sellers: Special Considerations
Clothing is harder to photograph than rigid products. Fabric drapes, folds, and moves. Fit depends on how the garment hangs. Color shifts under different lighting. Details like collars, cuffs, buttons, zippers, prints, and logo placement matter to shoppers who cannot touch the item.
These challenges exist whether you shoot DIY or use AI. The difference is in how each approach handles them.
Garment details that matter
When selling clothing online, pay attention to these elements:
- Collar and neckline construction
- Prints, patterns, and graphics
- Logo placement and size
- Seam quality and stitching details
- Fabric texture and weave visibility
- Button, zipper, and hardware finish
- Color accuracy across different lighting conditions
Shoppers use these details to judge quality, fit, and authenticity. A product photo that hides or distorts these elements can lead to returns and negative reviews.
How AI can help fashion sellers
AI product photography is particularly useful for fashion ecommerce in several ways:
- Generate lifestyle contexts without booking models, locations, or stylists. Show clothing in editorial or everyday settings that would otherwise require a full production shoot.
- Create lookbook-style visuals that turn a single product image into a broader campaign story. The AI Fashion Lookbook Generator can help create these editorial-style outputs from product photos.
- Produce pose variations for richer product pages. Multiple poses help shoppers understand fit, drape, and styling options without requiring another photoshoot. You can generate pose variations for product pages from existing product images.
- Create detail close-ups and mockup-style visuals that support product page completeness. The AI Fashion Detail Image Generator produces white-background images, fabric close-ups, and apparel detail shots for ecommerce listings.
When AI works well for fashion
AI generation tends to produce stronger results for fashion when:
- The reference image clearly shows the garment's shape, color, and key design features
- The goal is campaign visuals, seasonal adaptations, or catalog expansion (not necessarily hero fit images)
- You review outputs specifically for garment accuracy before publishing
- You use detail-focused models and workflows for items with intricate prints or textures
When traditional photography may still be needed
There are situations where AI is not the right primary tool:
- Hero fit images where accurate representation of how a garment fits on a body is essential
- Fabric texture verification where shoppers need to see exact weave, weight, and hand-feel
- Brand-building content where the photography itself is part of your brand identity
In these cases, use DIY or professional photography for the critical images, then supplement with AI for everything else.
Reference image strategy for fashion
If you plan to use AI for fashion visuals, your reference strategy matters. The strongest approach uses three images:
- Main shot: Clear front-facing view showing the full garment, color, and overall silhouette
- Detail shot: Close-up of the most important design element (collar, print, logo, or fabric texture)
- Back view: Shows cut, seam placement, and rear design details
This three-image input gives the generation model more visual information to work with and improves the chances that outputs will preserve important garment characteristics.
Building More Than Just Product Photos: A Complete Visual Strategy
One product photo is no longer enough for a competitive online store. Shoppers expect to see products from multiple angles, in context, and across different marketing channels. Your store likely needs more asset types than you realize:
- Hero product image: Clean white-background or primary lifestyle shot for the main listing
- Detail/close-up shots: Fabric texture, construction features, quality signals
- Lifestyle/context images: Product shown in use or in a styled environment
- Social media creatives: Different formats, backgrounds, and aspect ratios for each platform
- Ad creative variations: Different backgrounds and styles for A/B testing
- Short-form video content: Motion clips for social ads and product page engagement
Producing all of this traditionally means either a large photography budget or a significant time investment. AI changes the calculation by expanding one reference image into a full visual ecosystem.
How AI expands one reference into a complete asset set
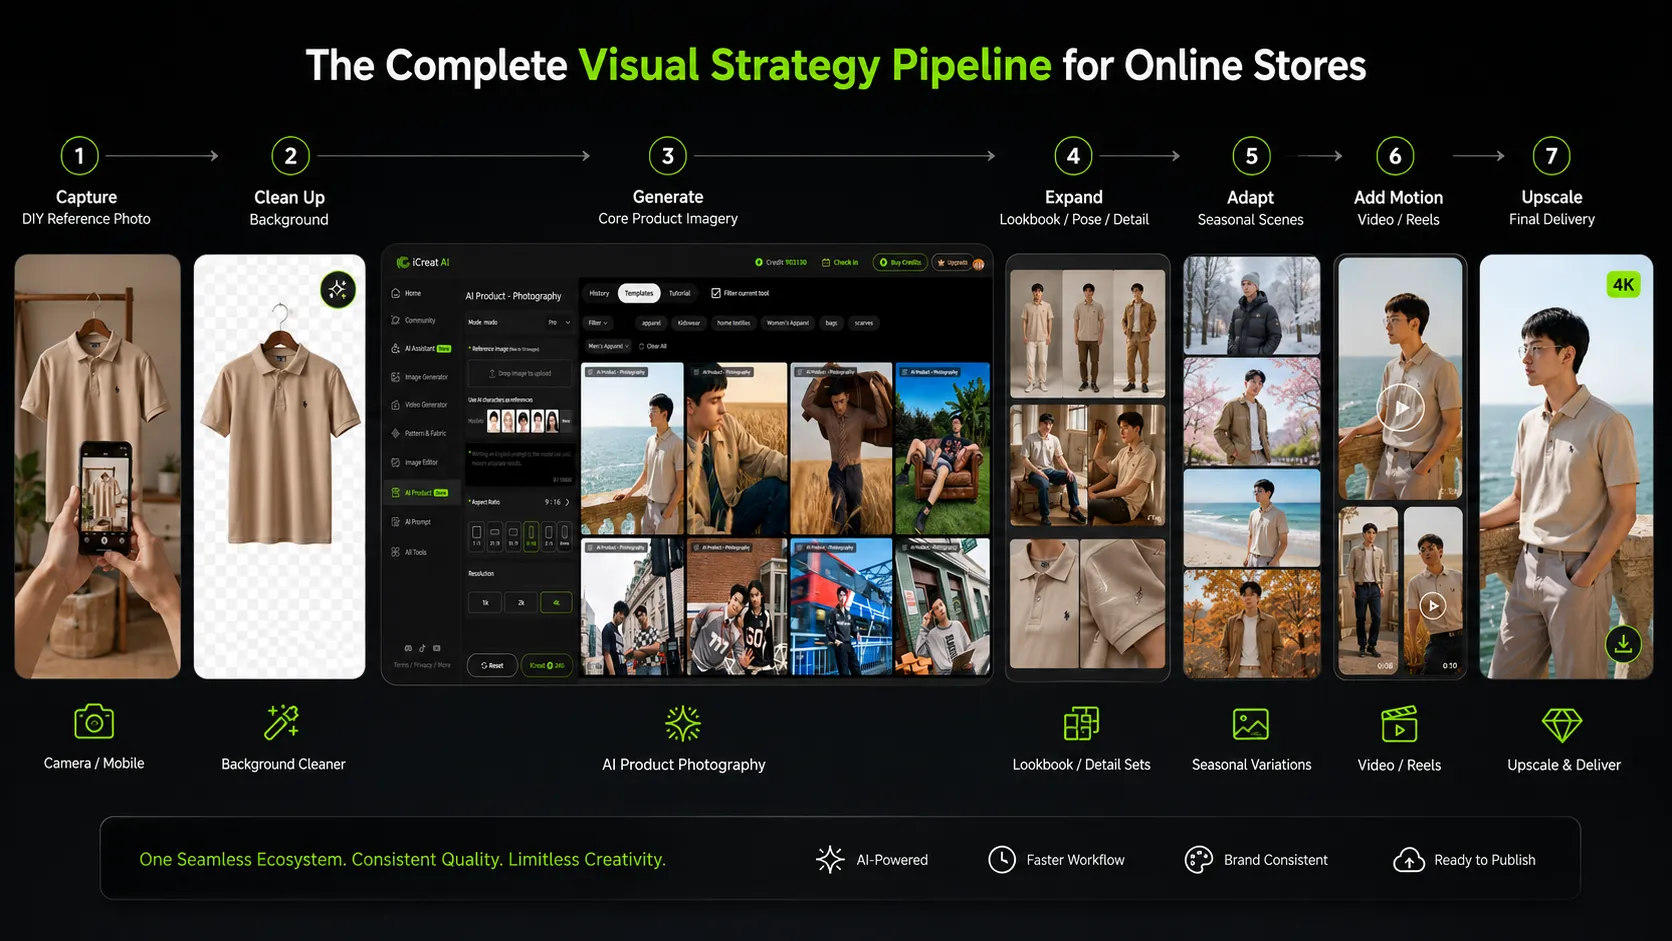
Starting from the same product reference image, iCreat AI's connected toolset can support multiple output types:
- AI Product Photography generates core product visuals, campaign images, and commercial-ready photos from reference inputs
- AI Fashion Lookbook Generator turns product images into editorial campaign visuals and collection storytelling assets
- AI Pose Generator creates multiple pose variations to add richness to product pages without reshooting
- AI Fashion Detail Image Generator produces close-ups, white-background images, and mockup-style visuals for product detail pages
- AI Image Replacer adapts visuals for seasonal campaigns, audience variations, or product swaps by replacing backgrounds, clothing elements, or other visual components
- AI Product Video turns static product images into short-form promotional videos for social ads and ecommerce marketing
This ecosystem approach means a fashion seller preparing a collection launch could start with a set of DIY reference shots and produce a complete visual suite -- product photos, lookbook images, pose variations, detail shots, campaign adaptations, and short videos -- from those same inputs.
Workflow concept
The practical flow looks like this:
- Capture one good DIY reference photo (or a small set) per product
- Clean up the reference with Background Remover if needed
- Generate core product visuals with AI Product Photography
- Expand into lookbook images, pose variations, and detail shots using specialized tools
- Adapt visuals for different seasons, audiences, or campaigns with AI Image Replacer
- Add motion by turning key images into short videos with AI Product Video
- Upscale final assets for high-resolution placements
Each step builds on the previous one, and the initial reference investment pays off across multiple outputs and channels.
Common Mistakes to Avoid
Whether you choose DIY, AI, or a hybrid approach, certain mistakes undermine results consistently:
Using blurry or low-resolution reference images. Both DIY editing and AI generation depend on input quality. A sharp, well-lit reference produces better outcomes than a blurry phone photo taken in dim lighting.
Inconsistent lighting or white balance across product photos. If your DIY shots vary in color temperature from warm yellow to cool blue, your store will look unprofessional. Use the same lighting setup for every shoot, or correct color in editing.
Only shooting one angle per product. Single-angle listings underperform because they leave shopper questions unanswered. Minimum three angles; five to seven is better for fashion and complex products.
Over-editing DIY photos. Over-sharpening, excessive saturation, or unnatural color correction makes product photos look processed and untrustworthy. Edit to correct, not to transform.
Writing vague AI prompts. Prompts like "make it look professional" give the model almost no direction. Specific prompts that describe lighting, background, composition, and mood produce more useful results.
Skipping the review step before publishing AI-generated images. AI outputs can look attractive while changing product colors, altering prints, or misrepresenting details. Always compare generated images against your actual product before listing.
Expecting AI to perfectly replicate complex garment details without good references. Intricate patterns, small logos, and subtle fabric textures may not reproduce accurately from a single distant reference shot. Provide detail images when accuracy matters.
Ignoring marketplace image requirements. Amazon, Shopify, Etsy, and Google Shopping each have rules about resolution, background, file format, and image count. Non-compliant images can be rejected or suppressed.
FAQ
Conclusion
Product photography for online stores without a studio is not about choosing between expensive equipment and low-quality snapshots. Realistic options exist at every budget level: a DIY setup starting under $100 can produce solid hero shots and reference images, while AI product photography can multiply those inputs into a full range of visuals without requiring additional cameras, lighting, or studio space.
The approach that fits best depends on what you sell, how many products you list, and how much visual variety your marketing needs. For most small and growing online stores, the strongest strategy combines a simple DIY reference photo with AI-powered generation for everything else. You get accuracy where it matters and speed and scale where you need volume.
If you have product photos ready and want to see what AI can produce from them, you can use iCreat AI's product photography tool inside the workspace. Upload a reference image, describe the visual you need, and review the outputs for your store. To get started, log in to iCreat AI and begin creating your first batch of product visuals.