



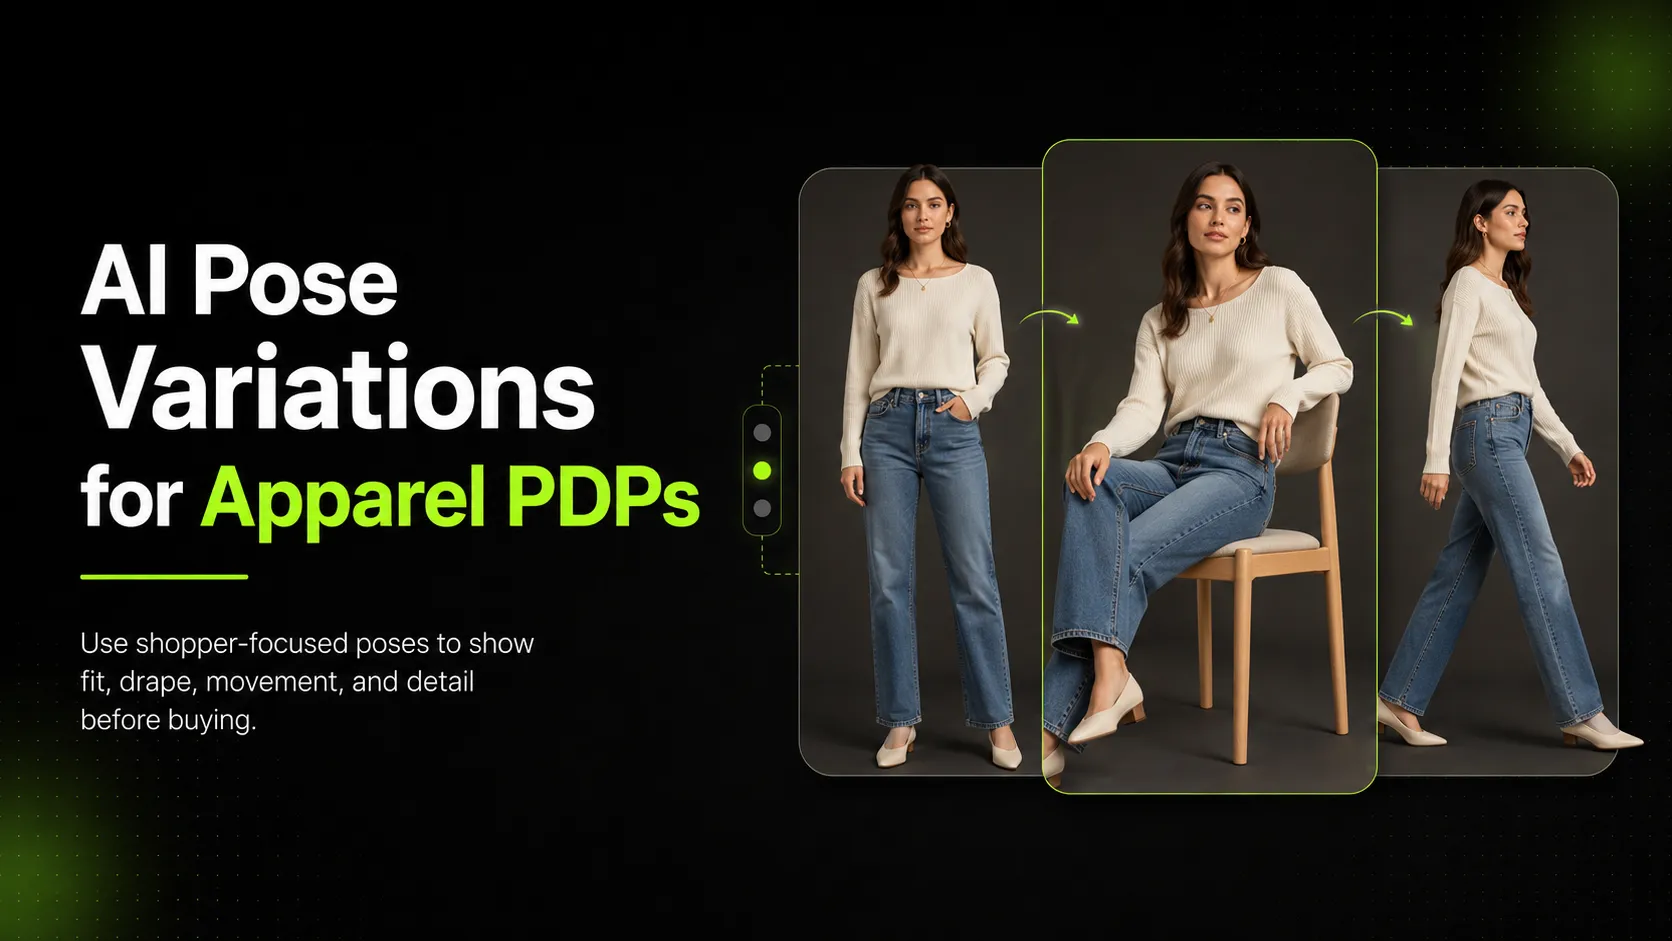
If your apparel product page only shows one clean standing pose, shoppers still have to guess the parts that decide the sale: how the waist behaves when seated, how the hem moves when walking, whether the back view is flattering, and whether the fabric looks thin or structured up close. AI pose variations can fill those missing gaps without scheduling another shoot, but only if you use them as shopper answers, not as random extra images.
The shift is simple: stop asking, "How many product images should we upload?" Start asking, "What is the shopper still unsure about?" A seated jeans photo answers a different question than a walking dress photo. A hoodie shown zipped, half-zipped, and open over a tee does more selling work than five versions of the same front pose.
This guide gives you a practical way to audit an apparel PDP and decide exactly which pose is missing. By the end, you should be able to look at a product page and say: "This tee needs a fabric close-up, not another model angle," or "These jeans need a seated fit image before we spend time on lifestyle shots."
Quick Answer
Introduction
- Use pose variations to answer specific shopper doubts: fit, drape, movement, back view, and fabric detail.
- Start most apparel PDPs with this sequence: front hero, three-quarter angle, fit-revealing pose, detail close-up, optional lifestyle or motion image.
- Do not generate more poses just to fill a carousel. A basic t-shirt may need 3 images; jeans, dresses, outerwear, and activewear often need 4-6.
- AI-generated poses work best when the original on-model photo is clear and each output is checked for garment accuracy before publishing.
Why Pose Variety Matters Specifically for Apparel PDPs
Apparel shoppers are not only asking, "Do I like this?" They are asking, "Will this look right on me?" That second question is where weak PDP imagery loses the sale. A phone case either fits the model or it does not. A dress, blazer, or pair of jeans can look polished in one pose and still leave the shopper unsure about fit, drape, scale, or movement.
Shopify's ecommerce photography guide recommends shooting from multiple angles and including close-up detail shots. For apparel, AI pose variation is the on-model version of that same idea: each pose should reveal something the last image could not.
Pose variety reduces that risk by showing the product in positions that reveal information a single static shot hides. A seated pose shows how fabric bunches at the waist. A walking pose shows how the hem moves with leg motion. A back view reveals construction details that affect perceived quality. Each additional pose answers one more question that would otherwise be answered only after purchase — or never answered at all, resulting in a return.
The practical question is not whether pose variety helps. It is where to add the next image so it removes the most doubt. If the shopper already understands the front view, your next image should not be another front view. It should show the side profile, seated fit, back construction, fabric texture, or movement.
The One-Image Audit Before You Generate Anything
Before creating new AI pose variations, look at the current product page and ask one question: what would a shopper still need to know before buying?
For a t-shirt, the missing answer may be fabric thickness or sleeve length. For jeans, it is often seated fit, waistband behavior, or the back pocket view. For a dress, it may be how the skirt moves when walking. For a hoodie, it may be how it looks open over a base layer.
This audit prevents the most common mistake: generating pose variety that looks impressive internally but does not answer a real shopper concern. The best pose is not the most creative pose. It is the pose that removes the next purchase objection.
Use this quick audit before creating anything:
| If the shopper may wonder... | The missing image is probably... |
|---|---|
| "Will this cling, bunch, or gap when I sit?" | Seated or crouching pose |
| "Does the silhouette look bulky from the side?" | Three-quarter or side angle |
| "What does the back look like?" | Back view or turned pose |
| "Is the fabric thin, heavy, ribbed, or textured?" | Close-up detail shot |
| "Does this move naturally?" | Walking, turning, or light motion pose |
Which Poses Drive Value for Apparel Shoppers
Not all poses are equally useful. A pose that helps sell a denim jacket may waste space on a basic t-shirt. Treat each pose like a sales associate answering one specific question. If the pose does not answer a question, it is decoration.
| Pose type | Shopper question it answers | When it adds the most value |
|---|---|---|
| Standing front | What does the item look like overall? | Always — this is your hero image |
| Three-quarter angle | How does the silhouette look from the side? | Structured garments (blazers, coats, dresses) |
| Seated / crouching | How does it fit when I'm not standing? | Fit-critical items (jeans, knits, leggings) |
| Walking / motion | How does the fabric move with my body? | Drape-sensitive items (dresses, flowy tops, skirts) |
| Back view | What is the construction like behind me? | Items with back details (zippers, cutouts, prints) |
| Close-up detail | What is the texture, stitching, or print quality? | Premium items where material justifies price |
This framework lets you evaluate any pose against one criterion: does it answer a question the shopper genuinely has before clicking add to cart? If a pose repeats information already visible in earlier images, it is probably redundant. That is the "aha" moment for most teams: AI pose variation is not about creating more images; it is about creating the missing image.
How Many Poses Does Your SKU Actually Need?
The number of poses a SKU requires depends on three factors: garment complexity, price point, and return sensitivity. A $25 basic tee should not receive the same image budget as a $180 fitted dress. The tee needs clarity. The dress needs confidence.
Decision Matrix: Pose Count by Category
| Category | Minimum poses | Recommended poses | Why |
|---|---|---|---|
| Basic knits (tees, tanks, basics) | 3 | Front, side, close-up | Simple garments; fit is forgiving; texture and color are main decisions |
| Fit-critical bottoms (jeans, leggings, trousers) | 4-5 | Front pocket, seated fit, walking stride, back, close-up | Seat, waistband, and leg shape vary dramatically by pose; returns are sensitive here |
| Woven / structured (shirts, blazers, jackets) | 4-5 | Front, three-quarter, seated, back, detail | Structure and shoulder alignment matter; wrinkles and seam lines show differently across poses |
| Drape-sensitive items (dresses, flowy tops, skirts) | 5-6 | Full-length standing, walking, seated, back, close-up, lifestyle | Fabric behavior IS the product; shoppers need to see movement |
| Outerwear (coats, hoodies, puffers) | 4-5 | Front zipped/open, layered, side, action, detail | Closure options and layering are core features; volume changes by pose |
| Activewear (sports bras, leggings, performance) | 4-5 | Front, stretching/motion, close-up fabric, side, detail | Stretch and compression are selling points; motion matters |
The cost of too few poses is hesitation. The cost of too many poses is clutter. The matrix above is a starting point; your own return reasons and image-click data should decide where you add or remove images next.
Structuring Your PDP Image Sequence for Maximum Impact
Pose order on a product detail page (PDP) is not arbitrary. Think of the carousel as a sales conversation. Image 1 gets attention. Image 2 reduces shape uncertainty. Image 3 answers fit. Image 4 proves detail. Image 5 adds context or emotion. If the sequence jumps randomly between these jobs, the shopper has to assemble the story themselves.
Step 1: Lead with the clearest possible representation
Position 1 should be your strongest on-model image: clean lighting, neutral pose, full product visibility. This is not the place for the most creative pose. It is the place for the clearest promise: what the item is, how it sits on the body, and whether the shopper wants to keep looking.
Step 2: Show the silhouette from a secondary angle
Position 2 should reveal what Position 1 hid. If Position 1 was straight-on front, Position 2 should be a three-quarter turn. If the item has a distinctive side profile (an asymmetrical hem, a draped neckline, pocket placement), make sure this angle captures it.
Step 3: Answer the fit question
Position 3 should show the product on a body in a natural, non-standing position. Seated, leaning, or mid-stride beats another standing pose from a slightly different angle. This is where a shopper stops looking at the model and starts imagining the garment in their own day.
Step 4: Show construction or detail
Position 4 zooms in or shifts focus to a specific attribute: fabric texture, stitching quality, print clarity, zipper hardware, or label placement. This image often carries more trust than teams expect. It tells the shopper, "We are not hiding the material. Look closely."
Step 5: Optional: lifestyle or motion context
If you have the assets, a fifth or sixth image can show the item in a styled or moving context. This is lower priority than Positions 1-4 but can increase engagement for higher-priced or seasonal items where emotional connection influences the purchase.
Pose Strategy by Apparel Category
The fastest way to improve this workflow is to stop treating "apparel" as one category. A tee, a blazer, and a sports bra do not sell through the same visual evidence. Use the category as your shortcut for choosing poses.
Basic Knits (T-shirts, Tanks, Basics)
Knits stretch and conform, so extreme pose variation produces diminishing returns. Focus on:
- Standing front as hero (shows color, graphic, basic fit)
- Three-quarter (shows sleeve length, side seam)
- Close-up (shows fabric weight, print sharpness, label)
Skip elaborate sitting or walking poses unless the knit has an unusual cut or fit. A basic crew-neck tee in five different poses will confuse the shopper more than inform them.
Fit-Critical Bottoms (Jeans, Leggings, Trousers)
Bottoms are where pose variety does the most selling work because seat shape, waistband fit, and leg line are make-or-break evaluation points:
- Front standing with hands in pockets or natural hang (shows waist fit)
- Seated (reveals waistband gap, thigh stretch, seat shape — the #1 return driver for jeans)
- Walking stride (shows how fabric moves with leg motion, heel stack)
- Back view (shows yoke construction, pocket placement, rear rise)
- Close-up (denim texture, stitch quality, hardware detail)
If you only produce three images for a pair of jeans, make one of them seated. It is the pose that tells shoppers whether the waistband gaps, the thighs pull, or the seat looks right.
Drape-Sensitive Items (Dresses, Flowy Tops, Skirts)
These garments look completely different across poses because fabric behavior IS the product:
- Full-length standing (overall shape and proportion)
- Walking or turning motion (how the hem and fabric flow with body movement)
- Seated elegant (how the garment pools and gathers at the waist/hips)
- Back view (closure type, open-back design, train length for gowns)
- Fabric close-up (material weight, print registration, sheer level)
For dresses especially, consider the occasion. A cocktail dress benefits from a posed, elegant stance. A sundress benefits from a casual, relaxed posture. Match the pose mood to the use case.
Outerwear (Coats, Hoodies, Puffers)
Outerwear has variable states (zipped vs unzipped, open vs closed, layered vs standalone) that are worth showing explicitly:
- Zipped/closed front (primary worn state, shows full silhouette)
- Open/unzipped (shows inner lining, layering potential, relaxed fit)
- Layered over a base piece (shows how it fits in a real outfit combination)
- Side or action (shows volume, sleeve fit, shoulder structure)
- Detail close-up (hardware, cuff design, pocket construction, fill material for puffers)
A hoodie worn three ways — zipped up, half-zipped, and open over a tee — communicates more about the product than the same hoodie photographed five times from the same standing angle.
Activewear (Sports Bras, Performance Leggings, Training Tops)
Activewear shoppers care about compression, support, and range of motion. Poses should reflect actual usage:
- Front standing (baseline fit and coverage)
- Stretching or reaching (shows compression behavior, strap adjustment for sports bras)
- Mid-motion (running stride for leggings, arm raise for tops — shows how the garment stays in place during activity)
- Side profile (seam placement relative to body, waistband position)
- Fabric close-up (moisture-wicking texture, mesh paneling, flatlock seams)
Static poses undersell activewear. If the item is designed for movement, at least one image should show it doing the thing it promises: stretching, supporting, compressing, or staying in place.
Using AI-Generated Pose Variations on Live PDPs
AI-generated pose variations can supply the pose diversity this strategy requires, but they require a higher review bar before going live on a production PDP than studio photography does. The reason is simple: a studio photographer sees the real fabric fall on a real body. An AI tool predicts how that fabric should behave in a new pose, and that prediction is not always correct.
When AI-generated poses work well on PDPs
AI pose variations are a good fit when:
- The reference image is high-quality (clear lighting, accurate fit, minimal occlusion).
- The target poses are within a moderate range of the reference pose (standing → seated works better than standing → handstand).
- The garment is relatively simple in construction (fewer small details for the AI to misplace).
- You have capacity to review each output before publishing.
When to be cautious with AI poses on PDPs
Apply extra scrutiny when:
- The garment has complex details (intricate prints, small logos, delicate lace, exposed zippers) that the AI may blur or distort.
- The pose change is dramatic (large limb movement can cause garment floating or unnatural joint angles).
- The product is high-price or flagship-tier where accuracy directly affects brand perception.
- You plan to use the image across multiple channels (PDP, ads, wholesale decks) where a single flawed image multiplies the problem.
Quality bar for AI poses on live PDPs
Before deploying an AI-generated pose variation to a live apparel PDP, check these specifically:
- Does the garment contact the body realistically? Floating fabric, missing shadows where fabric should rest against skin, or unnatural gaps between body and clothing are red flags.
- Are prints, logos, and labels preserved? Even minor distortion of a brand mark or text element can undermine professionalism.
- Is the body proportion consistent with your other PDP images? If Position 1 is a size M model and Position 3 looks like a size XL, shoppers will notice.
- Does lighting match reasonably across the pose set? Minor variation is acceptable; completely different lighting between positions breaks visual cohesion.
If an AI-generated pose fails these checks, regenerate it or exclude it from the set. A shorter pose sequence with accurate images is safer than a longer sequence that quietly changes the product.
To generate the missing poses identified in your audit, iCreat AI's AI Pose Generator lets you upload an existing on-model reference and create controlled pose variations from a structured professional library. That matters because the goal is not "more images." The goal is the specific seated, walking, back-view, or detail-supporting image your current PDP lacks.
Common PDP Pose Mistakes That Hurt Conversion
Showing the same pose from slightly different angles
Five standing poses rotated 15 degrees apart is not pose variety. It is visual repetition that gives the illusion of completeness without adding new information. Each position should answer a new shopper question or reveal a new product attribute.
Ignoring mobile viewing behavior
On a phone screen, the first 1-2 images carry more weight because shoppers often see only a small slice of the carousel before scrolling. If your best fit-revealing pose is buried in position 5 or 6, many shoppers will never reach it. Put the clearest hero image first, then use the next two images to answer the biggest fit or detail questions.
Mismatching pose style to apparel category
A formal, posed stance for a casual oversized tee sends a confusing signal about the brand. A slouchy, casual pose for a tailored blazer undermines the premium positioning. Match the pose attitude to the product's actual positioning and target customer.
Inconsistent lighting across the pose set
If Position 1 is bright studio lighting and Position 4 is warm ambient light with different shadows, the PDP feels like a collage of different photoshoots rather than a cohesive product presentation. Lighting does not need to be identical across every image, but it should feel like the same session or the same visual brand.
Over-investing in pose quantity for low-complexity SKUs
A $20 basic tank top does not need six on-model poses. Two or three well-chosen images (front, side, detail) plus a flat-lay or ghost-mannequin option often deliver better ROI than six on-model shots that increase page load time without adding proportional decision value.
Measuring Whether Your Pose Strategy Is Working
You do not need a complex analytics setup to start learning from your pose choices. Start with three signals: which images shoppers click, which products get fit-related returns, and which hero image wins in a simple test.
A/B test your hero pose
Run two versions of the same PDP with different hero images (same model, same product, different pose). One standing front, one three-quarter or seated. Let it run for a meaningful traffic volume (typically 1-2 weeks depending on your store's traffic level). Check whether add-to-cart rate or time-on-page differs between versions.
Track return reasons by SKU
If your returns data includes reason codes, correlate high-return SKUs with their PDP image configuration. Do high-return items tend to have fewer poses? Are specific pose types (or missing pose types) associated with fit-related returns? This pattern tells you where to add poses first.
Monitor image carousel engagement
Most ecommerce platforms (including Shopify) provide data on which PDP images shoppers click most frequently. If shoppers consistently skip Position 4 or bounce after Position 2, the sequence may need adjustment — either the pose is not useful or an earlier image is not doing its job.
Iterate seasonally
Pose preferences shift with fashion trends and seasonal contexts. A pose set that worked for spring/summer collections may need adjustment for fall/winter when layering becomes more relevant. Review your top 20 SKUs each season and check whether the pose mix still matches how shoppers are currently evaluating those products.
Quality Control Checklist for Apparel On-Model Images
Because this article guides readers toward publishing on-model imagery on live apparel PDPs, quality control directly affects return rates, brand trust, and conversion. Use this checklist before deploying any pose set:
Pre-Deployment QA Checklist
- [ ] Pose naturalness: The model's posture, weight distribution, and limb positions look like a real person wearing the item in a real situation. No frozen mannequin stiffness or impossible joint angles.
- [ ] Shopper relevance: Each pose answers a specific question a shopper would have before purchasing (fit, drape, construction, scale, movement). No pose exists purely to fill a slot.
- [ ] Product accuracy: Prints, logos, labels, buttons, zippers, hardware, and design details match the actual product across all poses. No distorted text, smeared graphics, or missing elements.
- [ ] Consistency: All poses in the set look like the same product on the same or visually consistent model. Body proportions, skin tone, and hair (if visible) are stable across the sequence.
- [ ] Category appropriateness: Pose style matches the apparel category and brand positioning (casual for basics, refined for tailoring, dynamic for activewear).
- [ ] Sequence logic: Image order guides the shopper progressively from overview → fit → detail → context. The most important image is Position 1.
- [ ] Resolution and format: Output meets platform requirements. Shopify recommends at least 1000px on the shortest side; 2048x2048 if zoom functionality is enabled. JPEG for standard web use; PNG only if transparency is needed.
- [ ] Channel compliance: Images follow background, aspect ratio, and content policies of the target platform.
If any critical check fails (especially product accuracy or misleading fit representation), do not publish that image to a live PDP. Regenerate, edit manually, or replace it. The cost of fixing one image before publication is lower than the cost of processing a return, responding to a negative review, or losing a repeat customer.
FAQ
---
If your current apparel PDP has a strong front-facing model photo but lacks seated, back-view, motion, or detail poses, use iCreat AI's AI Pose Generator to create those missing variations from your existing on-model image. Then place each output where it answers a real shopper question, not where it simply fills an empty carousel slot.