



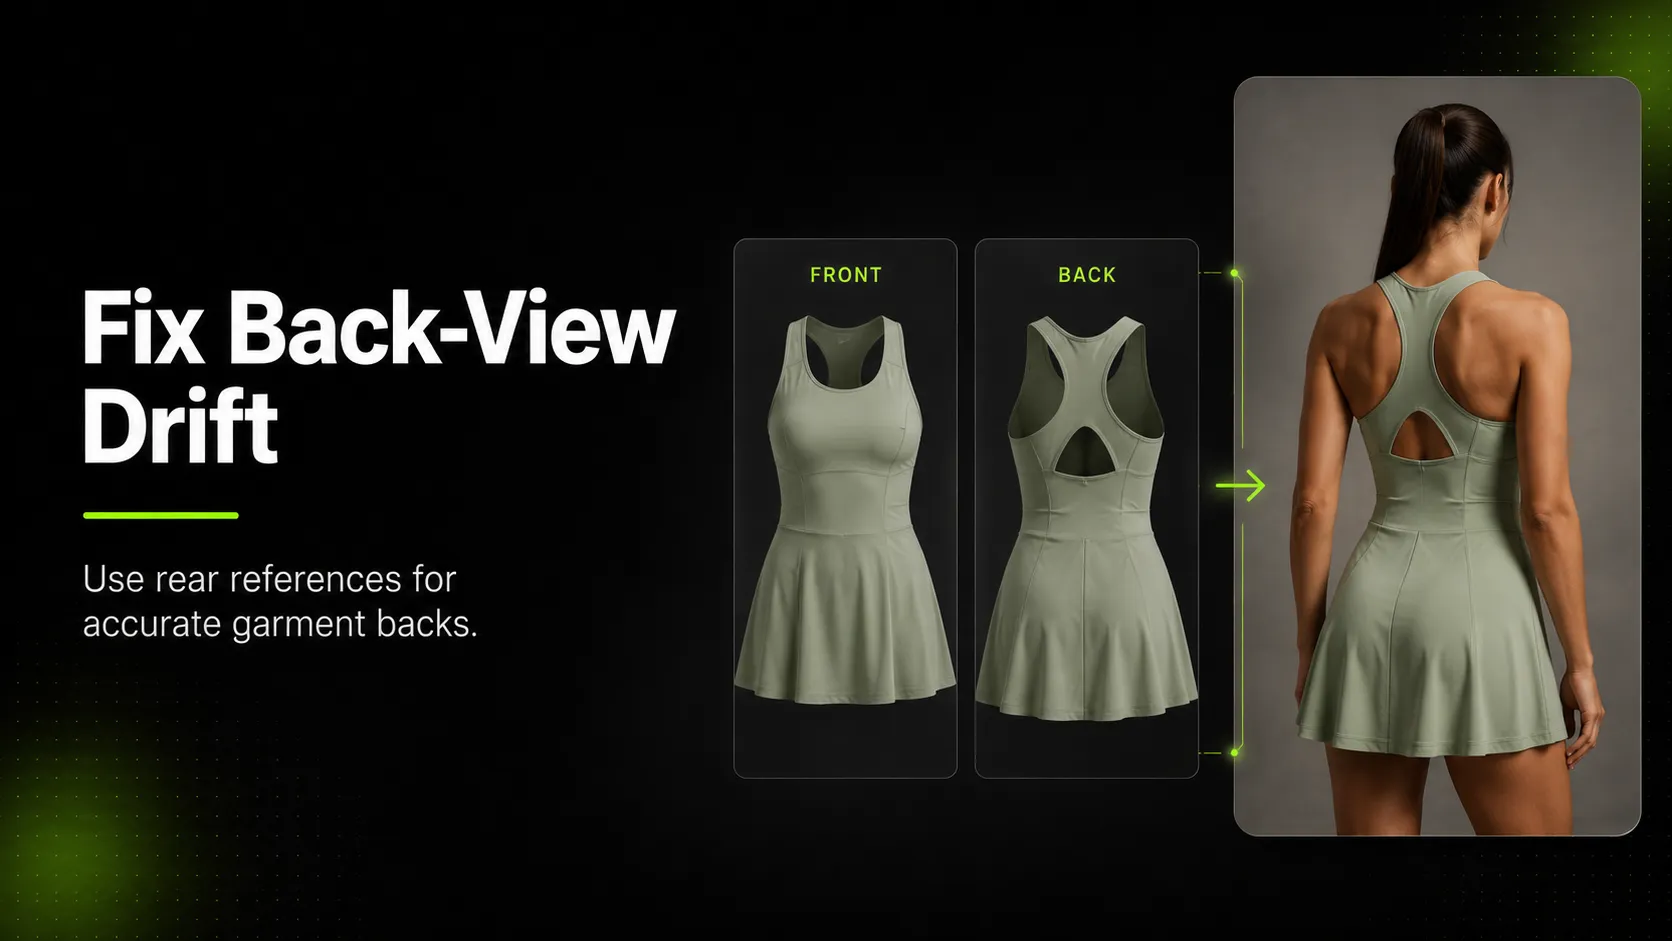
When you upload a single front-facing product image into an AI fashion tool and ask it to generate a model wearing the garment, the output often looks correct from the front but gets the back wrong. Straps appear where they should not. Embroidery vanishes or shifts position. A low-cut back becomes a standard round neck. A racerback design turns into a conventional tank shape.
This happens because the AI has no information about what the back of your garment looks like, so it invents one based on training data patterns rather than your actual product.
Back-view reference images solve this problem by giving the AI explicit visual data about the rear construction of your garment. When you provide a clean back-view photo alongside your main front image, the generation model can reference real details instead of guessing. The result is more accurate back-facing outputs that match what you actually sell.
This guide explains why back-view references matter, how to prepare them correctly, when they are worth the extra effort, and how to use them inside a production workflow.
Key Takeaways
- Back-view references reduce AI invention on garment backs by providing explicit visual input for rear construction.
- Not every garment needs a back-view reference -- symmetrical basics can work with front-only input.
- Quality matters: clean ghost mannequin or flat-lay shots at 1000px+ resolution produce the best results.
- The three-input workflow (main image + detail image + back-view image) gives each reference a specific role during generation.
- Always review AI outputs for back-specific details before publishing, even with strong reference inputs.
Why AI Struggles With Garment Backs
AI image generation models do not see your physical product. They process the pixels you upload and use those pixels plus their training data to construct a new image. When your only uploaded reference shows the front of a dress, jacket, or sports bra, the model must infer everything about the back from patterns it learned during training.
That inference produces several common error types:
Invented details: The AI adds straps, seams, zippers, or embroidery that do not exist on your actual product. This is especially common for garments with unusual or minimal back designs, because the model defaults to what it considers a "typical" back pattern for that clothing category.
Flipped asymmetry: If your garment has an asymmetric front (a one-shoulder top, an off-center zipper), the AI may mirror that asymmetry onto the back instead of preserving the actual back design. A one-shoulder neckline becomes a two-shoulder standard cut on the reverse side.
Missing design elements: Open-back dresses may be generated with solid fabric across the back. Low-cut racerback sports bras may show as standard tank-style backs. Back zippers disappear. Keyhole closures are filled in. These omissions happen because the model has no visual evidence that these features exist.
Distorted proportions: Hemlines that are longer in the back than the front (such as high-low dresses) get flattened to uniform length. Train details on evening wear vanish or shorten. Hoodie drawstrings appear at incorrect lengths or positions.
Which garment categories suffer most
Some garment types are more vulnerable to back-invention errors than others:
| Category | Why It Suffers | Example |
|---|---|---|
| Dresses with open or low-cut backs | The back is a primary design feature, not a mirror of the front | Evening gown with illusion back, summer dress with keyhole closure |
| Swimwear | Many swimsuits have distinct front and back designs (low-back bikini, strappy reversibles) | Low-back one-piece, multi-strap bikini top |
| Outerwear | Back details like vent slits, storm flaps, and yoke panels differ from front construction | Trench coat with back storm flap, bomber with ribbed hem panel |
| Activewear | Racerback straps, mesh panels, and back pocket placement are category-specific | Sports bra with T-back strap, running jacket with reflective back panel |
| Tops with back-specific hardware | Button placements, exposed zippers, tie closures | Blouse with back button placket, crop top with crisscross back straps |
When front-only references are sufficient
Not every garment needs a back-view reference. Front-only input works adequately when:
- The garment is roughly symmetric between front and back (basic crewneck tees, standard button-down shirts without back pleats).
- The back design contains no unique elements that shoppers need to see before buying.
- You only need front-facing outputs and do not plan to generate rear-angle visuals.
- The garment is simple enough that a plausible invented back would not materially misrepresent the product.
For these cases, uploading a single strong front reference and accepting minor back invention is a reasonable trade-off that saves preparation time.
What Makes a Good Back-View Reference
The quality of your back-view reference directly affects generation accuracy. A blurry, cropped, or angled back photo can introduce as many problems as it solves by giving the AI conflicting or incomplete information.
Resolution and clarity
Aim for at least 1000px on the shortest edge. Lower resolutions force the AI to interpolate missing detail, which can blur seam lines, soften print edges, or obscure small hardware like buttons or zipper pulls. Higher resolution gives the model cleaner pixel data to work from.
Shooting angle and framing
The ideal back-view reference is shot straight-on from directly behind the garment, at eye level, with the entire item visible in frame. Angled shots (shot from above, below, or from the side-rear) distort proportions and can confuse the model about where seams, hems, and straps actually sit.
Critical rule: never crop the reference so that part of the garment is cut off. If the hemline, a strap end, or a sleeve cuff falls outside the frame, the AI cannot account for it and will either invent that section or extend visible areas incorrectly.
Input format options
Three formats work well as back-view references:
Ghost mannequin back shot: A clean back view of the garment on an invisible or removable mannequin form, with the background removed or kept neutral. This is usually the strongest option because it shows natural drape and fit while keeping visual noise low.
Flat-lay back photograph: The garment laid flat and photographed from above, back-side up. Works well for items that hold their shape when flat (jackets, structured tops, knitwear). Less effective for drapey fabrics that lose their shape when laid flat.
On-model back photo: A photograph of a person wearing the garment, taken from behind. Can work if the pose is neutral and the full back is visible, but introduces body shape variables that the AI may interpret as garment features.
Background requirements
Plain white, light gray, or transparent backgrounds work best. Busy backgrounds (patterned surfaces, textured walls, cluttered studio environments) can bleed into the AI's understanding of the garment itself. If your source photo has a complex background, remove it before using the image as a reference.
Common mistakes to avoid
- Blurry or out-of-focus references: The AI will treat blur as actual texture or softness in the fabric.
- Shadowed back shots: Heavy shadows hide seam lines and create false contrast that the model may interpret as color variation or design detail.
- Wrinkled or creased input: Deep folds can be read as intentional design features rather than temporary creasing.
- Partial back views: Showing only the upper back or cropping below the waist leaves the lower half to AI invention.
- Mixed front-back composites: Do not stitch together two photos to make a fake "full view" -- the lighting and perspective mismatch will confuse the model.
The Three-Input Workflow: Main + Detail + Back-View
Some AI fashion tools accept multiple reference images and assign each one a specific role in the generation process. Understanding what each input controls helps you prepare better references and set clearer expectations for the output.
The AI Fashion Lookbook Generator uses a three-image upload workflow designed specifically for this type of multi-reference generation:
- Main image: Your primary product photo, typically a front-facing shot that establishes overall composition, color, silhouette, and general garment identity. This image anchors the generation's core visual direction.
- Detail image: A close-up shot focusing on texture, print, logo placement, stitching, fabric weave, or other fine details that might be lost at full-garment scale. This input helps preserve specific surface characteristics that the main image captures too broadly.
- Back-view image: A dedicated rear-facing shot of the garment that provides explicit visual data about back construction. This is the input that directly addresses the problem this article covers.
Each image serves a different purpose during generation. The main image tells the AI what the garment generally is. The detail image tells it what the surface looks like up close. The back-view image tells it what the rear construction actually looks like rather than what the AI might guess.
When all three inputs are clean, well-lit, and properly framed, the generation model has enough grounded visual information to produce outputs that stay faithful to your actual product from multiple angles. When any input is weak or missing, the model compensates by drawing more heavily from its training data, which increases the chance of invention.
Step-by-Step: Preparing and Uploading Your Back-View Reference
Step 1: Capture or source a clean back-view image
If you already have product photography that includes a back shot, evaluate it against the criteria above. If the existing photo is blurry, cropped, or poorly lit, reshooting the back specifically for AI reference use is usually worth the time investment.
If you do not have a back photo, take one using these guidelines:
- Use a ghost mannequin or flat-lay setup with even, diffused lighting.
- Position the camera straight-on from behind the garment at eye level.
- Ensure the entire item is visible with no cropping at edges.
- Shoot at the highest resolution your camera supports.
- Remove or replace the background with a plain neutral color.
Step 2: Review the reference against the quality checklist
Before uploading, check your back-view image against these minimum standards:
- [ ] Full garment visible, no cropped edges
- [ ] Shot from straight-behind angle, no severe perspective distortion
- [ ] Resolution at least 1000px on shortest edge
- [ ] Even lighting without heavy shadows obscuring details
- [ ] Plain or removed background
- [ ] No major wrinkles, folds, or creasing that could be misread as design
- [ ] Back-specific features (straps, zippers, embroidery, cutouts) are clearly visible
If the image fails more than two of these checks, improve or reshoot before using it as a reference. A bad reference can produce worse results than no reference at all.
Step 3: Upload in the correct slot and add reinforcing prompt language
When your tool supports dedicated image slots, upload the back-view image to the designated back-view or secondary reference position. Uploading it to the wrong slot may cause the system to treat it as a style reference or composition anchor rather than a structural guide.
In your prompt text, include language that reinforces back-view intent. Phrases such as `back view`, `shot from behind`, `rear view`, `show the back of the garment`, or `over-the-shoulder look` help orient the generation toward the angle you want. Without these cues, some models default to front-facing output even when a back reference is provided.
Step 4: Generate a small batch and compare variations
Generate 3-4 variations per request rather than a single image. AI generation has inherent randomness, and batch output lets you pick the option where back details align most closely with your reference. Compare each variation specifically for:
- Strap placement and count
- Neckline shape at the rear
- Zipper, button, or closure presence and position
- Embroidery, print, or pattern continuation to the back
- Hemline length and shape consistency
- Overall proportion match between front and back halves
Step 5: Evaluate whether the output is usable or needs regeneration
After reviewing the batch, decide for each variation: use as-is, regenerate with adjusted prompts, or flag for post-editing. Minor deviations (slight strap width difference, small print shift) may be acceptable depending on your publication context and quality standards. Major inaccuracies (missing design features, wrong garment type on the back) usually warrant regeneration with stronger prompt specificity or a improved reference image.
Advanced Techniques for Better Back-Accuracy
Once the basic workflow is in place, these techniques can help push back-output accuracy further:
Reference weight adjustments: Some tools allow you to control how strongly each reference image influences the output. If the back details are still not matching, increasing the weight of the back-view reference relative to the main image can help. Be aware that setting reference weight too high can lock unwanted artifacts (background remnants, lighting inconsistencies) into the output.
Prompt specificity for back features: Instead of a generic prompt, call out specific back elements that matter. For example: `open back with thin horizontal straps, center back zipper from neckline to waist, keyhole closure at upper back`. The more specific the description, the less room the model has to invent alternatives.
Angle keywords in combination: Using multiple orientation terms together (`back view`, `from behind`, `rear angle shot`) can reinforce the desired camera position more reliably than a single term. Different models respond differently to keyword combinations, so testing variations helps identify what works for your specific workflow.
Regeneration patience: If the first output gets the back wrong, adjust the prompt and try again before changing the reference image. Many AI fashion tools produce noticeably different results on a second or third attempt with slightly reworded prompts, even when the reference images stay the same. Small wording changes like swapping `show the back` for `rear view of the garment` can shift the model's interpretation enough to fix accuracy issues.
Cross-tool application: The same back-view reference principle applies beyond lookbook generation. When using AI Product Photography to create campaign visuals, or AI Pose Generator to generate pose variations that show rear angles, including a back-view reference improves output consistency across different tool workflows within the same platform.
Quality Checklist: Does Your Back Output Match the Original?
Before using any AI-generated image that shows the back of a garment, run through this checklist. The goal is not perfection -- it is catching material inaccuracies that could mislead shoppers or create returns.
Construction checkpoints
- [ ] Seam lines: Do back seams appear in positions that match the actual garment?
- [ ] Straps: Count, width, attachment points, and cross-pattern (racerback, T-back, standard) all correct?
- [ ] Zippers/buttons/closures: Present or absent as expected? Positioned correctly (center back, offset, full-length, partial)?
- [ ] Neckline shape at rear: Matches actual back neckline (round, V, scoop, open, keyhole)?
Design element checkpoints
- [ ] Embroidery/print/pattern: Does the design continue to the back in the right position, scale, and orientation?
- [ ] Cutouts/openings: Are open-back sections, cutout shapes, and illusion panels present and correctly shaped?
- [ ] Hardware: Buckles, D-rings, eyelets, and decorative elements in the right locations?
- [ ] Hemline: Length and shape consistent with actual back hem (especially important for high-low or asymmetric designs)?
Fabric and drape checkpoints
- [ ] Fabric appearance: Texture, sheen, and weight look consistent between generated front and back portions?
- [ ] Drape behavior: Does the way fabric falls on the back match the material type (stiff vs. fluid, structured vs. stretchy)?
Decision framework
After checking, categorize the output:
Accept as-is: All critical checkpoints pass. Minor cosmetic differences exist but do not misrepresent the product.
Accept with note: Critical checkpoints pass but one or two non-critical details are slightly off. Document the deviation for internal reference; decide based on how visible the difference will be at final display size.
Regenerate: One or more critical checkpoints fail. Adjust prompt or reference and generate new variations before publishing.
Post-edit required: The output is close but needs targeted correction (inpainting a missing zipper, adjusting a strap position). Only pursue this if your team has editing capacity and the base output is strong enough to justify the effort.
When Back-View References Are Worth the Extra Effort
Preparing a high-quality back-view reference takes time: shooting or sourcing the image, checking it against quality standards, and managing an additional file in your upload workflow. That effort pays off most when the garment's back design is materially different from its front, or when back accuracy affects shopper purchase decisions.
Definitely use a back-view reference
Upload a dedicated back-view image when your garment has any of these characteristics:
- Open-back or low-back designs: Evening gowns with illusion backs, summer dresses with keyhole closures, tops with bare-back cuts. The back IS the design feature here.
- Racerback or unconventional strap configurations: Sports bras with T-back or racerback straps, tanks with crisscross rear straps, halter-style backs. Standard strap assumptions will be wrong.
- Back-specific hardware: Exposed center-back zippers, button plackets running down the spine, lace-up or tie closures, adjustable buckle systems.
- Back-only design elements: Embroidery placed exclusively on the rear panel, back-print graphics, yoke contrast panels, vent slits, storm flaps.
- Asymmetric or directional designs: Garments where the back silhouette differs meaningfully from the front (high-low hems, cape backs, draped or bloused rear construction).
Nice to have but not essential
Consider adding a back-view reference when:
- The garment has complex multi-panel construction where side-seam and back-panel alignment affect overall fit impression.
- Long tails, trains, or extended back hems need accurate representation.
- You plan to generate rear-angle outputs even if the back design is relatively simple.
- The garment falls in a category where shoppers commonly check rear views before buying (blazers, tailored jackets, formal wear).
Probably skip the back-view reference
A dedicated back-view image is usually unnecessary when:
- The garment is a basic tee, standard tank, or simple pullover with no distinguishing back features.
- The shirt is a conventional button-down without back pleats, darts, or yoke detailing.
- The item is a simple accessory (hat, bag, scarf) where "back" is not a meaningful concept.
- The design is fully symmetric between front and back with no rear-specific elements.
- You only need front-facing outputs and have no plans to generate rear-angle visuals.
FAQ
Conclusion
Back-view reference images address one of the most common failure modes in AI fashion generation: the invented garment back. When an AI model has no visual data about the rear construction of your product, it fills the gap with training-data guesses that often miss design-critical details. Providing a clean, well-prepared back-view reference gives the model explicit information to work from, which reduces invention and improves output accuracy.
The approach that works best combines three ingredients: a quality back-view reference that meets resolution, framing, and clarity standards; a tool workflow that accepts dedicated back-view input alongside main and detail images; and prompt language that reinforces rear-angle intent during generation.
For fashion ecommerce teams that need lookbook-style visuals showing products from multiple angles, the AI Fashion Lookbook Generator supports this approach through its three-image upload workflow (main image + detail image + back-view image), assigning each reference a specific role in the generation process. For teams applying back-view principles to product photography or pose variation workflows, the same reference-quality principles apply across AI Product Photography and AI Pose Generator.
The output will not be perfect every time. AI generation always involves some degree of interpretation, and even strong references cannot eliminate all invention. But a systematic back-view reference workflow significantly raises the baseline accuracy of rear-facing outputs, which means fewer regenerations, less post-editing time, and visuals that represent your actual product more faithfully.